Our Family Motto
We, the Peterson Family:
Promise to be honest in all we do and say,
Stand tall and righteous throughout each day.
Serve around the world and in our home,
Give thanks for blessings we’ve been shown.
We’ll work as a team with joy and love,
And honor our Heavenly Father above.
Monday, December 27, 2010
Pudding Paint
Supplies:
Vanilla Instant Pudding
Milk
Black Paper
Directions:
Let your children paint a white winter scene using vanilla pudding and their fingers! What a delicious work of art!
Hot Tubbing
I bet it’s been a while since you’ve been to the pool! Get wet and have fun with this colorful activity!
Supplies:
• ½ cup liquid hand soap, clear or white
• 1 teaspoon cornstarch
• Food coloring
Directions:
1. Combine the soap and cornstarch in a small bowl.
2. Divide the mixture into separate containers, then add food coloring one drop at a time. Caution: Test the paints on a small area of your tub or wall first to make sure they won't leave a stain; darker hues may be more difficult to wash off.
Tips:
Apply to tub and body with fingers or paintbrushes. Use bathroom cleanser to clean the tub if any color remains. Keep any leftover paints in airtight containers in the refrigerator for up to three days.
Q-Tip Snowflakes
Supplies:
•Blue construction paper or cardstock (or whatever color of background you'd like)
•Q-Tips
•Glue
•Scissors (optional)
Directions:
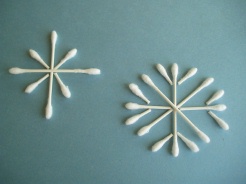
Cut your Q-Tips in various sizes or, just use them whole for younger children. Use them to create beautiful snowflakes on your blue paper. Glue all of your Q-Tips in place and you're finished! Remember, no two snowflakes look alike!
Snowman
Supplies:
Three Potatoes: One large one and two smaller ones
White Acrylic Paint and Paint Brush: For that faux-snow look
Sharp Knife: Only grownups should handle the knives!
Wooden Skewer or Chop Stick
Embellishments: Buttons, pom-poms, ribbon, googly eyes…
Tiny Triangular Slice of Carrot: What's a snowman without a carrot for a nose?
Small Sticks
Raisins: Four or five for the project; the rest of the box can be for a snack!
Hot Glue Gun and Glue Sticks: Remember, kids and hot glue don't mix, so make sure you do all the gluing!
Directions:
Have your child paint the potatoes white with the acrylic paint and let them dry.
Cut a thin slice off of the long side of the biggest potato to create a flat surface for the snowman to "stand" on.
Stack the two smaller spuds on top of the big potato. Secure the pile by sticking the wooden stick up through the stack of potatoes. The potatoes should now look like a miniature stacked snowman.
Invite your child decorate his snowman.
Have him add googly eyes or small black buttons for peepers. You can glue them on with a hot glue gun.
Help him cut a small length of ribbon and tie it around the Spudman's neck for a scarf.
Using the hot glue gun, secure a few pom-poms to his head to create a hat.
To make arms, whittle one end of a stick to make a point. Stick the pointed end into the middle potato to give Mr. Spudman some limbs.
Help him cut a small wedge of carrot for a nose and glue that on, too.
Glue four or five raisins under the nose to make a mouth.
You can then hot-glue some buttons down his torso and your Spudsy Snowman is complete.
Toss out your snowman when he starts to mold or sprout. Snowmen can't stick around forever. As the old holiday classic put it: "Frosty the snowman had to hurry on his way. But he waved goodbye sayin' please don't cry, I'll be back again some day." (Maybe as soon as Mom's next trip to the grocery store!)
Week 52: Winter
*Suggested Reading*
Hello Snow by Hope Vestergaard
I Like Winter by Lois Lenski
Snowball Fight! by Jimmy Fallon
Snowmen at Night by Caralyn Buehner, Mark Buehner (Illustrator)
The Snow Dude by Daniel Kirk
Items needed this week:
Vanilla Instant Pudding
Milk
Black Paper
A half cup liquid hand soap, clear or white
One teaspoon cornstarch
Food coloring
Blue construction paper or cardstock (or whatever color of background you'd like)
Q-Tips
Glue
Scissors
Three Potatoes
White Acrylic Paint and Paint Brush
Sharp Knife
Wooden Skewer or Chop Stick
Embellishments: Buttons, pom-poms, ribbon, googly eyes…
Tiny Triangular Slice of Carrot
Small Sticks
Raisins
Hot Glue Gun and Glue Sticks
Snack Suggestion: Blizzards
Blend together a banana and a scoop of ice cream in a blender. We started to call these blizzards after the kids commented that it looked like a blizzard when it was swirling around in the blender (this was right after they had seen Rudolph the Red Nosed Reindeer).
Paper Bag Santa Puppet
Supplies:
• Paper Bag
• Red,black and white construction paper
• Glue
• Scissors
• 2 Googly eyes
• Cotton balls
Instructions:
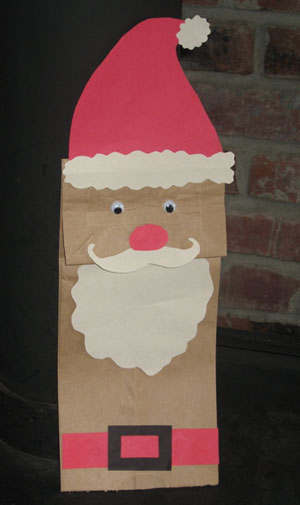
In Red, cut a heart shape for the inside of the mouth, the main part of the hat, a oval for the nose, a long rectangle for the belt.
In Black, cut a black buckle.
In White, cut a beard, a mustache, the bottom of the hat, the puff at the top of the hat.
Glue the heart underneath the flap of the bag. Glue the beard just bellow the flap. Glue the mustache on the edge of the flap overlapping a little. Glue the nose overlapping the mustache a little. Glue the white parts to the red main part of the hat, then glue the completed hat to the top of the bag. Glue white cotton balls to the white parts. Glue the black buckle to the red rectangle, then glue that to the bottom of the bag. Glue the googly eyes in place (If you don't have googly eyes, draw the eyes on with a marker).
Reindeer candy canes
This preschool Christmas craft is easy and enjoyable -- for you and your children. Spend no time at all building your candy canes to give as gifts or to decorate your tree. These little guys can hang on each bough of the Christmas tree to display your kids' hard work.
Supplies:
One package of red and white striped candy canes
Small, red pon pons
Small, black pon pons
One package of brown pipe cleaners
One package of small googly eyes
Scissors
Glue
Directions:
1. Begin your candy cane reindeer by removing all candy canes from the box -- leaving them all wrapped in plastic.
2. Measure 3 inches of brown pipe cleaner and cut. Wrap each 3 inch section of pipe cleaner around the hook of the candy cane to form antlers (measure evenly, with the center on the candy cane). Curl and bend the pipe cleaner to your desire.
3. Glue a red or black pon pon on the end of each candy cane (at the end of the hook) for a nose.
4. Glue 2 googly eyes beneath your antlers and above your nose.
Make as many or as few as you want. They're simple, adorable, and great to spark other preschool Christmas craft ideas. These reindeer candy canes are fun to hook on your tree, tie with ribbon and hang from shelves or your mantle, or stick in small pots or mugs around your house.
Sew up a Stocking
Gingerbread House
Ingredients:
- white frosting (bought or made from scratch)
- graham crackers
- milk containers from school lunch - one for every child
- small squares of cardboard - one for each child
- white coconut
- mini marshmallows
- gumdrops
- licorice
- life savers
- any other fun, decorative candies
- cake decorator bags with tips
Directions:
Put frosting in bags with tips.
Glue milk carton down (using frosting as glue) to cardboard square.
(Do next step for smaller children, or, with bigger children, allow them to do it themselves). Put a graham cracker square on 2 milk carton sides. Glue together with frosting. It's okay if it gets on grahams, it looks like snow!
Repeat with other sides.
Angle two grahams at the top for the roof and glue together with frosting.
Now let the kids have fun. White coconut can be used for snow, candies can be glued on the outside of the house, mini marshmallows can be used to build snowmen.
Bigger marshmallows work better with smaller children.
Glue everything with frosting. Now the children’s' houses are completely edible, or can be put up for display.
Week 51: Merry Christmas
*Suggested Reading*
The Nutcracker by Janet Schulman, E. T. A. Hoffmann, Renee Graef
The Oldest Elf by James Stevenson
The Polar Express by Chris Van Allsburg
The Christmas Star by Marcus Pfister
Mooseltoe by Margie Palatini
Items needed this week:
Paper Bag
Red,black and white construction paper
Cotton balls
One package of red and white striped candy canes
Small, red pon pons
Small, black pon pons
One package of brown pipe cleaners
One package of small googly eyes
Red felt
Green Yarn
Scissors
Glue
Glitter, beads, cotton balls…
White frosting (bought or made from scratch)
Graham crackers
Milk containers from school lunch - one for every child
Small squares of cardboard - one for each child
White coconut
Mini marshmallows
Gumdrops
Licorice
Life savers
Any other fun, decorative candies
Cake decorator bags with tips
Snack Suggestion:
*M&Ms
More Than Colors
These special little candies,
Come in colors bright and fun.
There’s more than color to be found;
A story of God’s Son.
The M’s turn into W’s,
If you turn them upside down.
A few more turns and E and 3’s
Are waiting to be found.
M is for the manger,
Where Mary laid her precious boy.
Little did the world know,
This baby would bring great joy.
The W is for the Wise men,
Who followed a bright star.
The star revealed a king was born,
They came but, oh, so far.
In Bethlehem they found Him,
Just as they had been told.
3 is for the gifts they brought;
Frankincense, myrrh and gold
W is also for their worship,
As they bowed before their King,
Salvation is the promise given,
There’s nothing we can bring.
Faith alone is how we come
He died to set us free.
E is for eternity,
God’s gift to you and me.
Monday, December 13, 2010
Bake me a Cake
Ingredients
• 1 1/2 cups water
• 4 ounces unsweetened chocolate
• 1/3 cup cocoa powder
• 1 cup butter, at room temperature
• 3/4 cup granulated sugar
• 3/4 cup brown sugar
• 3 large eggs
• 1 teaspoon vanilla extract
• 2 cups all-purpose flour
• 1 1/2 teaspoons baking soda
• 1/4 teaspoon salt
• Frosting
Instructions
1. Heat the oven to 350º. Grease and flour two 9-inch round pans and set them aside. In a microwave-safe liquid measuring cup, measure 1 1/2 cups water. Add the unsweetened chocolate squares to the water. Microwave for 2 to 3 minutes, stirring after 1 1/2 minutes or until the chocolate has melted. Stir in the cocoa and set the mixture aside.
2. In a large mixing bowl, cream the butter for 1 minute; add the granulated and brown sugars and cream for another 2 minutes or until light and fluffy. Add the eggs individually, beating well after each one. Beat in the vanilla extract.
3. In a separate bowl, stir together the flour, baking soda, and salt. Beginning with about a third of the flour, add the flour mixture and chocolate mixture alternately to the butter and sugar, stirring well after each addition.
4. Divide the cake batter evenly between the two pans, scraping the bowl with a rubber spatula. Place the pans on the middle oven rack and bake for 25 to 30 minutes or until a toothpick inserted in the middle of the cakes comes out clean.
5. Let the cakes cool in the pans for about 10 minutes. Then place a cooling rack atop each pan and, holding the edges to the pan, flip the cake onto the rack. Cool completely before frosting.
6. Place one layer on a plate and spread the top with chocolate frosting. Place the second layer on top and then frost the top and sides of the cake.
7. For a finishing touch, decorate the top and bottom edges of the cake with a piped icing border. Serves 8 to 10.
Frosting:
• 2 1/2 Cups powdered sugar
• 2 Tablespoons water
• 1 Tablespoon light corn syrup
• 1 Tablespoon softened butter
• 1 Tablespoon vanilla extract
• Food coloring to tint
The frosting is ready after all ingredients have been incorporated. If the frosting is too thick, add a teaspoon of water until it reaches the desired consistency.
Good morning Blue Berry Muffins
Ingredients:
• 2-1/2 cups plus flour
• 4 teaspoons baking powder
• 1/2 teaspoon salt
• 1/2 cup plus sugar
1/4 cup butter, melted and cooled or vegetable oil
• 1 egg
• 1 cup milk
• 1 teaspoon vanilla
• 1-1/2 cups blueberries
Preparation:
Preheat oven to 375 degrees F. Grease 12-cup muffin pan. Combine 2-1/2 cups flour, baking powder, salt and 1/2 cup sugar. Set aside. In another bowl combine second set of ingredients. Add to dry ingredients and stir only until moistened. Combine blueberries with 1 tablespoon flour. Then add blueberries to rest of batter. Place in muffin tin. Sprinkle batter tops with sugar. Bake for 20 to 25 minutes.
Banana Bread
Ingredients:
• 1 3/4 cup all purpose flour
• 2 tsp. baking powder
• 1/4 tsp. baking soda
• 1/2 tsp. salt
• 1/3 cup shortening
• 2/3 cup sugar
• 2 eggs, beaten
• 1 cup banana (mashed)
Instructions:
Preheat oven to 350 degrees F.
Cream shortening and sugar, beat in eggs until frothy. Add flour, baking powder and soda, salt alternating with mashed banana.
Once thoroughly mixed pour into 9x5x3" loaf pan. Bake for approximately one (1) hour. Cool in pan 10 minutes before removing.
Nuts of your choice may be added prior to baking for additional flavor and texture.
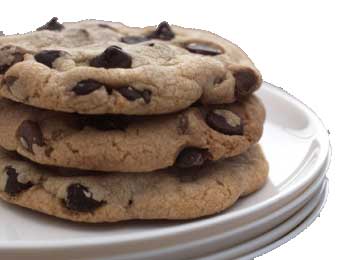
Chocolate Chip Cookies
Ingredients:
• ¾ cup Butter flavored Crisco
• 1 ¼ -cup firmly packed brown sugar
• 2 tablespoons milk
• 1 tablespoon vanilla
• 1 egg
• 1 ¾ cup flour
• 1 teaspoon salt
• ¾ teaspoon baking soda
• 1- 12oz. Bag chocolate chips
Instructions:
Preheat oven to 375 degrees F.
Cream Crisco, brown sugar, milk, and vanilla in a mixing bowl. Blend until creamy. Blend in egg. Combine flour salt and baking soda in a separate bowl. Add to creamed mixture, gradually. Drop by tablespoonful onto an ungreased cookie sheet.
Bake at 375 for 8-10 minutes
Week 50: Baking
Tuesday, December 7, 2010
Mad Hatter Tea Party
Supplies:
Paper plates
String
Odds and Ends from your craft collection
Cheese and Crackers
Hot dogs
Juice
Apples and Peanut Butter
Sugar cubes or marshmallows (optional)
Directions:
Start out the party by decorating Mad Hatter Hats! Then, set the perfect Wonderland table. Use a table cloth and mismatched place settings. Prepare some tasty finger foods and make the tea! Sit down and enjoy a very happy unbirthday!
Hats:
Have your children decorate a paper plate with any glitzy craft supplied you have. (Feathers, glitter, beads, ribbon, leaves, flowers, yarn, or tissue paper). Punch a hole on either side of the plate and tie a ribbon through. Tie the hat onto the child’s head.
Finger foods:
Cheese and Crackers
Apples and peanut butter
Hot dog pieces on tooth picks
Tea:
Simply warm up some juice (orange, apple, Kool-Aid, grape) on the stove or in the microwave. Allow children to add a spoonful of sugar to each cup of “tea”.
Pirates Treasure Hunt
Supplies:
Shoe box or jewelry box
Glitter and glue to decorate the treasure chest
Five pieces of bright colored paper for clue
Crayons or Markers
Chocolate Coins
Popcorn
Root Beer in a bottle
Directions:
First, you need to make your pirate ship! While the children are coloring place 4 clues around the house. Make the clues easy to identify by using bright colored paper. Even children as young as 2 can play this game by using pictures instead of words on the clues. (e.g. Leave a picture of a bathtub. The next clue should be in the bathtub.) Give the first clue to the children and send them on their quest. The final clue will lead to the treasure! Decorate a shoe box with gold paint and sparkles or use a jewelry box to make your treasure chest. The treasure can be any special surprise! I suggest chocolate coins, root beer in the bottle, and pirate’s booty (popcorn). The kids will LOVE it!
Jungle Safari Lion King Mini Golf
Supplies:
Golf clubs (or sponge and yardstick)
Golf ball or rubber ball
Masking tape
Glue
Scissors
Markers
Shoe box
Cardboard
Coffee can
• Use your own clubs, or masking tape a new sponge to a yardstick
• Build your course (see ideas below) using the coffee can for the final hole.
• Take turns playing your way through your course.
• Save your obstacles for the next rainy day.
Golf Course Ideas:
• For a tunnel, cut out the bottom of an empty oatmeal box, and place the box on its side.
• To make a house, turn a shoe box upside down and cut out an entrance from one end, and the exit from the other end.
• Fold a piece of cardboard in half and set it up like a tent for the ball to go through.
• Place two or three frisbees on the floor to form a curved fairway for the ball to go through.
• Make a ramp by scoring (run one point of the scissors in a straight line without cutting all the way through) a piece of cardboard twice. Bend slightly at each score mark to create a upside, flat, and downside to your ramp. Put some books under the center section for support.
• For a straight fairway, use two rows of building blocks.
• Make a sand trap from a hula hoop.
• For a pipe use paper and tape it.
• Put a chair or stool in the center of the room for the ball to go under.
Set up stuffed animals around the course and sip on some “Jungle” juice when you’re done with your game! (Jungle Juice: ½ apple juice, ½ Sprite)
"Cars" Car
Supplies:
Empty cardboard boxes
Utility knife or box cutter
Scissors
Masking tape
Glue String or twine
Paper or disposable colored plastic plates
Brads
Permanent markers
Decorating materials
Directions:
Step 1
Open the top flaps of the box. Remove three of them with a utility knife or box cutter. Leave one flap, which will become the windshield. Or leave two flaps--one for the windshield, and one for the back window.
Step 2
Turn the box upside down and draw a circle in the center of the bottom of the box. The circle should be large enough to allow your child to slip his or her feet through and pull the box up to wear around the waist. Reinforce the bottom of the box with masking tape if necessary.
Step 3
Draw and then cut out armholes near the top of the sides if the box is a large one so that your child can wear the car like a shirt. Otherwise, just fashion shoulder straps from string or twine and tie them to holes poked in the upper body of the car.
Step 4
Glue a smaller box to the front of the car for the hood, and another to the back for the trunk. Ask your child to decorate a paper plate for a steering wheel. Attach the steering wheel to the "dashboard" of the interior of the car with a brad, so that it will turn. Cut "flames" from colored cardboard or construction paper and glue them onto the back tires.
Step 5
Use permanent markers or paints to create doors on the car. Add tires, lights and windshield wipers. Tires can be made from paper plates and attached with brads so that they will turn, if you wish. Create a license plate with your child's name on it from a plain piece of paper, and affix it to the trunk of the car. Colored tape is great for racing stripes. Ask your child to finish decorating the car. Boys and girls, start your engines!
Week 49: All things Disney
*Suggested Reading*
*On your trip to the library this week find 5 of your favorite Disney stories!
Items needed this week:
Paper plates
String
Odds and Ends from your craft collection
Cheese and Crackers
Hot dogs
Juice
Apples and Peanut Butter
Sugar cubes or marshmallows (optional)
Shoe box or jewelry box
Glitter and glue to decorate the treasure chest
Five pieces of bright colored paper for clue
Crayons or Markers
Chocolate Coins
Popcorn
Root Beer in a bottle
Golf clubs (or sponge and yardstick)
Golf ball or rubber ball
Masking tape
Glue
Scissors
Markers
Shoe box
Cardboard
Coffee can
Empty cardboard boxes
Utility knife or box cutter
Scissors
Masking tape
Glue String or twine
Paper or disposable colored plastic plates
Brads
Permanent markers
Decorating materials
Preparations to be made:
Turn up the Disney tunes and put on the Disney movies! Mickey Mouse here we come!
Tuesday, November 30, 2010
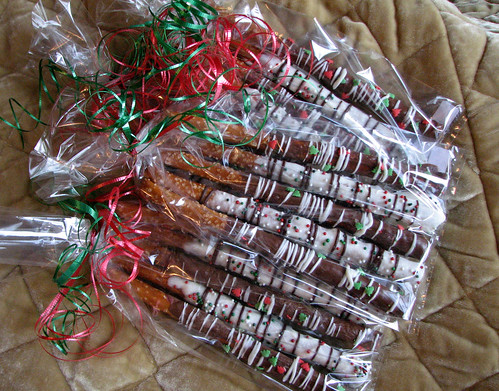
CHOCOLATE DIPPED PRETZELS
Supplies:
One (11 1/2 oz.) pkg. chocolate chips
One 1/4 c. Crisco
Fifty (3 inch) twisted pretzels or 1 lb. mini pretzels
Sprinkles
Directions:
Combine over hot (not boiling) water, chips and Crisco; stir until chips melt and mixture is smooth. Remove from heat but keep chocolate over hot water. Dip pretzels into chocolate and coat evenly; shake off any excess coating. Place pretzels on waxed paper-lined cookie sheets. Chill in refrigerator until coating sets (15 minutes). Gently loosen from wax paper. Serve immediately or store in refrigerator.
These are great for giving to friends and neighbors!
The Hand Prints Poem Framed
Supplies:
Paint
Card Stalk Paper
Frame
Directions:
It is so much fun to dip our little one's hands in paint and plop it on everything. It never gets old. I suggest for this home made gift, you buy the frame first. That way you can compliment or match the colors of the paint that you choose for their hand print to the frame. If your child is especially wiggly, and you are afraid to mess up the creation by him or her moving, use this tip. Simply try doing his hand print on regular paper the color of your project. Then, when you get it right, you can cut the hand print out and paste it to the actual project. I have done this several times and it looks just as good. You could even use a different color paper if you want it extra colorful or are going with a series of colors for the right look.
For a fancier look, try using a really nice black or brass frame and use a bold color like black to do their hand prints. You can also experiment with different kinds of paper. You can print the poem on several sheets to start in case you have a hard time getting the hand print just write. You could also do it only once and use the extra paper tip. Here is the poem.
Sometimes you get discouraged
Because I am so small
And always leave my fingerprints
On furniture and walls
But every day I grow a bit
And I'll be big someday
Then all those tiny finger prints
Will all be washed away.
So here's a print of my two hands
To help you recall
Just how my hands looked
When they were very small.
Garden Plaque
Supplies:
Plaster of Paris
Aluminum pie case
Shells, pebbles, acrylic gems, marbles or other water-resistant treasures to decorate. You could even use small plastic toys such as figures or toy cars.
Directions:
Make sure that you have a covered surface to work on and your children have overalls to protect their clothes. Gather all your materials in advance, as Plaster of Paris dries quickly.
Mix up the Plaster of Paris in an old jug according to the instructions on the packet. Pour into the pie case.
Carefully lay your decoration on top (note: they will sink a little no matter how carefully you do this; if you are too rough they will sink a lot!)
Leave to dry for a couple of hours and then remove the plaque from the pie tray.
Dig a hole in the garden and pop in the plaque. Back-fill with soil so that the top of the plaque sits level with the flower bed.
Box of Love
To make this gift you'll need:
Small plain boxes- Jewelry boxes work very well
Glitter, sequins or any ornamentation
Ribbon
Printed poem, on good
Stock paper if possible
This is a very special gift
That you can never see.
The reason it's so special is,
It's just for you from me.
Whenever you are happy,
or even feeling blue.
You only have to hold
this gift and know
I think of you.
You never can unwrap it
Please leave the ribbon tied.
Just hold the box close
to your heart,
It's filled with love inside.
Have your child decorate the boxes in anyway
she/he pleases. Add ribbon and the poem
with the signature.
Tips:
Try your local Jewelry Store for boxes.
I was able to purchase them for
25 cents each.
Week 48: Time to Craft
*Suggested Reading*
(Fun books!)
The Snowy Day By Ezra Jack Keats
Harold and the Purple Crayon By Crockett Johnson
Jamberry By Bruce Degen
Cars and Trucks and Things That Go By Richard Scarry
Charlie and Lola Series By Lauren Child
Items needed this week:
One (11 1/2 oz.) pkg. chocolate chips
One 1/4 c. Crisco
Fifty (3 inch) twisted pretzels or 1 lb. mini pretzels
Sprinkles
Paint
Card Stalk Paper
Frame
Plaster of Paris
Aluminum pie case
Shells, pebbles, acrylic gems, marbles or other water-resistant treasures to decorate You could even use small plastic toys such as figures or toy cars
Small plain boxes- Jewelry boxes work very well
Glitter, sequins or any ornamentation
Ribbon
Printed poem, on good
Stock paper if possible
Preparations to be made:
This is a good week to start working on your advent calendar for Christmas!
Advent Countdown:
LIST OF GIFTS: (LISTED IN THE ORDER THEY ARE USED)
1. Quarter
2. Grape flavored gum
3. Picture of a smile
4. Goldfish Crackers
5. Birthday candle
6. Bell
7. Fish crackers
8. Cotton balls
9. Piece of a map
10. Soap
11. Heart sticker
12. Cross
13. Packet of salt
14. Sand
15. Flowers(silk)
16. Raisins
17. Seeds
18. Christmas carol
19. Small rock
20. Crumpled foil
21. Mustard seed
22. Dove
23. Small scrap of woolly material
24. Blue marble
25. Picture of a baby.
December 1 - A quarter! That equals 25 cents. But 25 also stands for the number of days till Christmas, when God gave us His best present. Jesus told about one woman's gift and the way she gave it. Read: Mark 12:41-44
December 2 - Grape Gum! Grapes make jelly and juice, raisins and wine. But Jesus didn't need grapes to perform His first miracle. Read: John 2:1-10
December 3 - Here's a smile! A smile usually expresses happiness. Jesus gave us many instructions to keep us happy. Read: Matthew 5:1-12.
December 4 - Fish! Well, if you were surprised to find these fish, wait till you read the story today! Others were surprised to find fish, too. Read: Luke 5:4-7
December 5 - A birthday candle? As you know, we are getting ready to celebrate Jesus' birthday. However, Jesus talked about something else that is related to this candle. Light! Read: Matthew 5:14-16
December 6 - You could make some noise with this. But it would not have bothered a certain man--until he met Jesus. Read: Mark 7:31-37
December 7 - These would not go very far if you were really hungry! But Jesus could make much out of little. Surely He knew how to multiply! Read: Matthew 14:13-21
December 8 - These cotton balls would be helpful in a thunder storm, wouldn't they? We could use them for ear plugs to muffle the loud noises that thunder makes. But we know someone who doesn't need cotton. Jesus can control the weather. Read: Matthew 8:23-27
December 9 - People needing to use the other parts of this map are in trouble! Don't you get lost today! Read: John 14:1-6
December 10 - It's soap. Do you like to wash? Behind your ears? Washing turned out to be a happy time for a man who met Jesus. Read: John 9:1-7
December 11 - Hearts. Wordlessly, they speak of love, don't they? Jesus spoke some commands about love. Read: Matthew 25:17-41
December 12 - We use the cross as a symbol, representing Jesus. Do you know why? Read: Philippines 2:1-11
December 13 - Ordinary salt. Yes, Jesus related salt to us and our behavior. He also gave us some advice. Read: Matthew 5:14 and Colossians 4:6. (Notice that He doesn't recommend pepper!).
December 14 - Don't try to eat this! It's sand. It reminds us that Jesus knows something about architecture, about buildings--and building lives. See His instructions: Matthew 7:24-29.
December 15 - Flowers are pretty, aren't they? Jesus used flowers to teach us a reassuring lesson. Read: Matthew 6:28-34.
December 16 - Raisins! Many children are given raisins instead of candy for a snack. That's because they are a health-promoting and delicious fruit. Jesus told us how we can produce good fruit. Read: John 15:1-5.
December 17 - Jesus told a story about seeds that man planted. Then He explained it, revealing its deep meaning. Read: Matthew 13:3-8 and Matthew 13:18-23.
December 18 -Christmas is just about a week away. And here is an appropriate song. Sing it loudly! Read: Psalms 100.
December 19 - A hard stone! Can you change this stone into a piece of bread? Do you think Jesus could? Jesus was asked to do just that. Do know how He handled it? Read: Matthew 4:1-4.
December 20 - Try to smooth out this piece of aluminum foil and use it as a mirror. It's hard to see your reflection plainly, isn't it? Many circumstances are hard to understand, but someday everything will be clear. Read: 1 Corinthians 13:12.
December 21 - The mustard seed is the smallest there is! When it sprouts, it grows into one of the largest plants! See what Jesus said. Read: Matthew 17:20.
December 22 - We've learned that the cross represents Christ, but do you know what the dove stands for? Read: Matthew 3:13-17.
December 23 - The threads that compose this fabric came from the wool of a sheep. Jesus called Himself the good shepherd. Do you know who His sheep are? Read: John 10:7-18.
December 24 - A marble! Do you know what is sometimes called the "Big Blue Marble"? The world. God made the world for us. What does God continue doing to the world? And who is the world? Read: John 3:16.
December 25 - Isn't this baby cute? When he was born, he made a whole family happy. Jesus was born a baby, too. He came to make the whole world happy. Read: Luke 2:1-20. Enjoy your celebration today. Continue to learn about Jesus--and love Him forever!
Comments about This Craft:
We used the Advent Countdown idea using cardboard egg cartons in our recent Advent Rotation. First, I painted all of the egg cartons. This took some time, so plan ahead. Then I took circle-shaped labels from the dollar store and numbered them 1 - 24, and placed one in each holder. Finally, we set up an assembly line and had the children put each item in a holder. As we went along, we briefly talked about what story the item could be representing. I typed out the list of what the items represented and the scripture reference to take home. The kids all enjoyed the activity, especially trying to guess which Bible story was represented by the items.
Monday, November 22, 2010
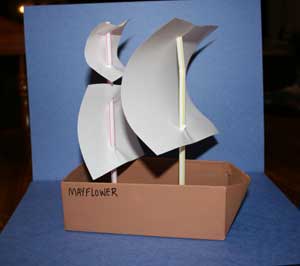
Mayflower Craft
Supplies:
• 1/2-gallon milk or juice carton
• X-acto knife
• Paper bag
• White glue
• 2 bamboo skewers
• 2 apples
• White paper
• Construction paper
Directions:
1. Close and tape shut the opening of a clean carton, then lay it on its side. Using an X-acto knife (a parent's job), cut out the side of the carton that's facing up.
2. Cut 1-inch strips from the paper bag, dip them into a glue mixture (made from 1 part white glue mixed with 4 parts water), and wrap the strips around the carton. Repeat until the carton is covered with paper bag panels.
3. Stick one skewer in each apple and attach white paper sails (made by cutting out large white triangles and then cutting the tops off them). Attach a flag over each sail. Set the skewered apples in the boat.
4. Invite your family and guests to write down on paper slips something they're thankful for, such as "I am thankful for Grandpa's homemade cranberry sauce." Fold and place the slips in the "Mayflower" for reading before your Thanksgiving feast.
Pine Cone Turkey Craft
Supplies:
• Nice plump pine cone
• Feathers (assorted colors)
• Brown, red, orange and yellow felt
• Goggley eyes
• Turkey pattern
• Scissors
• Glue
Directions:
1. Wash and dry pine cone if you picked it outside.
2. Cut out the turkey body pieces.
3. Glue head, eyes, nose, gobbler and feet on the pine cone.
4. Glue 4-7 Feathers on the top of the pine cone.
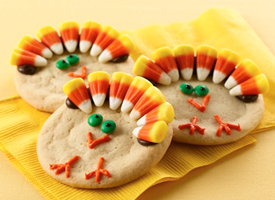
Thanksgiving Turkey Cookies
INGREDIENTS
1 roll (16.5 oz) Pillsbury® refrigerated sugar cookies
1 container (16 oz) chocolate creamy frosting
Candy corn
Orange decorating icing
Black decorating gel
Miniature candy-coated chocolate baking bits
DIRECTIONS
1. Heat oven to 350°F. Bake cookies as directed on roll. Cool completely, about 20 minutes.
2. Spoon chocolate frosting into resealable food-storage plastic bag; seal bag. Cut small hole in bottom corner of bag. On each cookie, pipe frosting on outer edge of half of cookie. Arrange candy corn over frosting for feathers.
3. Pipe orange icing onto each cookie to resemble turkey face and feet. Use orange icing to attach baking bits to turkey face for eyes. Pipe black gel on baking bits for centers of eyes.
Tree of Thanks
Supplies:
• Several colors of foam squares
• Tree pattern
• Leaf pattern
• Glue
• Permanent Marker
Directions:
Create this autumn tree of gratitude. Write something that you're thankful for on each leaf. Display your tree of thanks on your holiday table! Cut out the tree and the leaves. Ask you child what things they are thankful for and write them on each leaf. Then have your child glue the leaves to the tree.
Week 47: Thanksgiving!
*Suggested Reading*
The Very First Thanksgiving Day by Rhonda Gowler Greene
Thanks for Thanksgiving by Julie Markes
P is for Pilgrim: A Thanksgiving Alphabet by Carol Crane
Pilgrim's First Thanksgiving by Ann Mcgovern
I Know an Old Lady Who Swallowed a Pie by Alison Jackson
Items needed this week:
• 1/2-gallon milk or juice carton
• X-acto knife
• Paper bag
• 2 bamboo skewers
• 2 apples
• White paper
• Construction paper
• Nice plump pine cone
• Feathers (assorted colors)
• Brown, red, orange and yellow felt
• Goggley eyes
• Turkey pattern
• Scissors
• Glue
• One Roll (16.5 oz) Pillsbury refrigerated Sugar cookies
• One Container (16 oz) chocolate creamy frosting
• Candy Corn
• Orange Decorating Frosting
• Black Decorating Frosting
• Mini candy coated chocolate baking bits
• Several colors of foam squares
• Tree pattern
• Leaf pattern
• Glue
• Permanent Marker
Monday, November 15, 2010
Gifts for Grannies!
Letters to the Troops
Toys for Tots (and clothes!)
Soup for the Sick
Week 46: Service
Monday, November 8, 2010
Build a Fort!
Living Room Luau
Supplies:
Hula dancers and fire dancers: You and your kids
Garbage bags: To make "grass" skirts
Construction paper: In tropical floral colors like pink, red and orange
A bunch of plastic straws: For the lei. But save some for the cocktails!
Dental floss or yarn: To string the lei on
Hawaiian music: We like Elvis's classic "Blue Hawaii". Hail to the King!
Plastic zipper bag: The big freezer kind
Traditional centerpiece items: Like ferns, leaves and flowers
Scissors
Red, orange and yellow tissue paper: To make some fire
Colorful table cloth
Hawaiian cocktails: Pina coladas and mai tais.
Hawaiian Food: You can make your spread as simple as a few plates of cut up pineapple and papaya or go all out with some authentic Hawaiian cuisine. Waikiki meatballs anyone?
Directions:
The first thing that happens when you get to Hawaii is you get leid! So gather up the construction paper, straws and floss or yarn and have the kids create paper leis.
First, help your kids draw several 3-inch diameter flowers on the construction paper.
Then help them cut the flowers out and poke a hole in the center of each flower.
Cut two straws up into 2-inch pieces.
Cut 2-foot pieces of yarn or dental floss (one per luau guest) and have your kids string the lei together, alternating flowers and straws.
When they're finished, help them tie it together.
Next, have them make the requisite grass skirts.
Pick up some large green or tan colored garbage bags. (If black or white is all you have on hand, that's fine too.)
To make each skirt, lay one garbage bag flat on the floor.
Help your kids cut the sealed bottom off.
Then help them cut the bag into 2-inch strips, starting at the bottom of the bag and ending about a foot from the end with the drawstring (or closer for shorter kids).
When the bags are cut, have each person try them on and trim them to the desired length. Most grass skirts are knee length. (You can tell that to your preteen, who insists on hiking the skirt up to her hipbones!)
Tighten the waistband by pulling the drawstring taught, tying it and rolling over the top to hide the drawstring.
When the skirts are finished, crank up the heat and bust out the girl's bikini tops (we draw the line at coconut shells). Boys can put on cool, colorful tee-shirts and Bermuda shorts if the idea of wearing a skirt freaks them out.
If you have any aspiring fire dancers in the family, break out the colored tissue paper. Shred it into long thin strips and tape it together at one end to make a "flame." Your kids can wave it around during their fire dance.
Traditional luau meals were eaten on mats on the floor. So clear out the coffee table and lay down a colorful table cloth.
Your kids can then create a centerpiece out of ferns, leaves and flowers.
Help the kids prepare food for the luau either by slicing up a pineapple or slicing, dicing, frying and baking up a whole feast, like kahlua pork sandwiches and Waikiki meatballs.
When the food is ready, lay it out on platters on the floor.
Finally, the moment you've been waiting for! Mix up some Hawaiian cocktails like Orange-Pineapple Hawaiian Punch, Pina Coladas and Mai Tais. Don't forget the little drink umbrellas, and settle down for the feast.
Pop in some Hawaiian music and encourage your kids to perform a hula dance! Have the boys grab their "flames" and join in with some
Pom-Pom Teddy Bears
Supplies:
One large pom-pom for the body
One medium pom-pom for the head
Fives mall pom-poms for legs and ears
Two tiny pom-poms for the nose and tail
Plastic eyes to glue on (or marker to draw eyes)
Glue (tacky glue works best)
Black bead (for top of teddy's nose)
Directions:
Glue the head pom pom to the body pom pom. Give it time to dry before going on to the next step.
Put glue on 2 of the smaller pom poms. Then press the pom poms onto the body pom pom.
Now glue the 2 arms onto the body.
Glue on the small nose pom-pom. Glue on a black bead to your teddy's nose. Then glue on the 2 googly eyes (or draw with marker).
Now glue on the 2 ears using small pom poms. Set them right up on the top of your teddy bear's head.
Tie Die Shirts
Supplies:
Plain white t-shirts, hats, shoes, sheets, towels, etc.
Fabric dye in a variety of colors
Rubber bands
Spray bottles
Newspaper to protect your table or ground outside
Directions:
Tie knots in your plain white shirt or gather sections of the fabric and secure rubber bands for fun designs.
Mix dye and pour into various spray bottles.
Have the kids spray the dye onto the shirts.
Let dry for 6-8 hours or overnight before wearing. Enjoy!
Week 45: Warm and Cozy at Home
*Suggested Reading*
Cloudy with a Chance of Meatballs by Judi Barrett
Chicka Chicka Boom Boom by Jr, Bill Martin
The Little Mouse, the Red Ripe Strawberry, and the Big Hungry Bear by Don and Audrey Wood
The Little Engine That Could by Watty Piper
The Grouchy Ladybug by Eric Carle
Items needed this week:
Garbage bags
Construction paper: In tropical floral colors like pink, red and orange
A bunch of plastic straws
Dental floss or yarn
Hawaiian music
Pineapple, Coconut…
Plastic zipper bag: The big freezer kind
Ferns, leaves and flowers
Scissors
Red, orange and yellow tissue paper
Colorful table cloth
One large pom-pom
One medium pom-pom
Fives mall pom-poms
Two tiny pom-poms
Plastic eyes to glue on Glue
Black bead Plain white t-shirts, hats, shoes, sheets, towels, etc.
Fabric dye in a variety of colors
Rubber bands
Spray bottles
Newspaper to protect your table or ground outside
Sunday, October 31, 2010
Peter Peter Pumpkin Eater
Supplies:
Orange construction paper
Another sheet of paper any color
Pictures of men and women
Glue
Scissors
Directions:
Cut out a large pumpkin shape that will fit on a 8x11 piece of construction
paper. Cut a window shape in it. Have the children find pictures in a magazine or catalog of a man and a woman to represent Peter and his wife. Glue the lady inside the pumpkin looking out the window and glue the pumpkin on the other sheet of construction paper then glue Peter on the side of the pumpkin. I then add the words of the nursery rhyme on the page also. You can do several other pages of different nursery rhymes and make a book for the children. They like it when they can take it home to read it to Mom and or Dad
Twinkle Stars
Old King Cole Crowns
Supplies:
Heavy paper
Collage materials
Scissors
Glue
Directions:
Cut crown shapes out of heavy paper. Have a wide variety of materials available for decoration. ( buttons, lace, paper, tissue paper, macaroni) Let the children glue the collage material to the crown. When it dries staple to fit the child's head.
Humpty Dumpty
Supplies:
Red paper
White paper
Scissors
Glue
Crayons or markers
Directions:
Trace an oval and get the kids to cut it out. On a bottom of a piece of construction paper, get the children to tear some red construction paper to look like bricks and glue it on the bottom. Get the kids to draw facial features on the oval. Glue the oval on top of the brick wall. For legs, I used strips of construction paper folded accordion style.
Week 44: Nursery Rhymes
*Suggested Reading*
Sylvia Long's Mother Goose by Sylvia Long
Mary Engelbreit's Mother Goose: One Hundred Best-Loved Verses by Mary Engelbreit
My Very First Mother Goose by Iona Opie
The Real Mother Goose by Blanche Fisher Wright
New Adventures Of Mother Goose The by Bruce Lansky
Items needed this week:
Orange construction paper
Another sheet of paper any color
Pictures of men and women
Star shape
Glue
Sparkles
Hole punchers
Yarn
Heavy paper
Collage materials
Scissors
Red paper
White paper
Crayons or markers
Monday, October 25, 2010
Paper Bag Masks
Supplies:
Paper Grocery Bag
Crayons
Markers
Scissors
Glue
Directions:
Very simple or very elaborate masks can be made from grocery bags. Start with crayons, markers, scissors and glue, and let your imagination go wild.
*** Please don’t forget to go to the Pumpkin Patch and get pumpkins to carve this week! Roast the pumpkin seeds too!***
Spaghetti Cobwebs
Cooked spaghetti (cold)
White glue
Waxed paper
Directions:
Have the children dip the spaghetti into the glue and arrange the pieces onto the waxed paper. When the spaghetti dries, carefully peel the "cobweb" off the waxed paper. Hang from the ceiling.
Halloween Witch
Supplies:
• Paper plate
• Orange yarn
• Green paint
• Paint brush
• Scissors
• Black construction paper
• Item for nose
• Glue or glue stick
Directions:
1. Paint the backside of your paper plate green. Let dry before proceeding.
2. Punch two holes on sides of rim, slightly above center to hold yarn for hair.
If you have a hole punch this works well.
3. Cut ten 12 " lengths of yarn for each side of the head. Cut two 6" pieces of yarn and then tie each group of 10 yarns together, at the center. Using the 6 " piece, now thread through hole on side of head and tie in place. Repeat for other side.
4. Cut a triangle shape for the witch's hat. Glue in place.
5. Draw eyes and mouth with the black marker.
6. Glue nose in place.
We used one of those peanuts for packing material for our nose but you could just scrunch up a tiny bit of paper and tape with masking tape to make a nose.
Footprint Ghosts
Supplies:
White paint
Black paper
Markers
Directions:
Paint each child's foot with white paint and print it on a black sheet of construction paper. When it dries add eyes to the heel part of the foot. That will be the ghost's
Week 43: Happy Halloween
*Suggested Reading*
Big Pumpkin by Erica Silverman
Bugs That Go Bump in the Night by David A. Carter
Halloween Night by Arden Druce
Halloween Sky Ride by Elizabeth Spurr
Haunted Castle on Hallows Eve by Mary Pope Osborne
Items needed this week:
Paper Grocery BagCrayons
Markers
Scissors
Cooked spaghetti (cold)
White glue
Waxed paper
White paint
Black paper
Clear plastic gloves
Candy corn or Hot Tamales candyPopcorn
Orange and black ribbon
Plastic spider rings
Paper plate
Orange yarn
Green paint
Paint brushScissors
Black construction paper
Item for nose
Snack Suggestion: Halloween Treat Bags
• Clear plastic gloves
• Candy corn or Hot Tamales candy
• Popcorn
• Orange and black ribbon
• Plastic spider rings
Directions:
1. Stuff a piece of candy corn in each finger of the clear plastic glove to resemble fingernails. If you wish, you can use the Hot Tamales candy instead to resemble painted fingernails.
2. Fill it with popcorn (no butter!).
3. Tie it at the wrist with orange and black ribbon.
4. Place a plastic spider ring on one of the fingers.
Monday, October 18, 2010
Go to the Zoo!
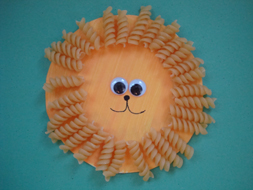
Macaroni Lion
Supplies
• Rotini (spiral pasta)
• Paper plate or sturdy paper
• Paint and brush (if you're using a paper plate)
• Glue
• Black marker
• Google eyes (optional)
Directions:
1. Cut a circle from a paper plate or sturdy paper. If you are using a paper plate you will need to paint it yellow, make sure you paint the back of the paper plate (the eating side usually has a coating on it the makes it hard to paint on).
2. Glue your spiral macaroni all around the outside of your circle to make your lion's mane.
3. Once you have your mane glued on, add some eyes, nose and mouth!
Play-Dough Animals
Supplies:
Animal Cookies
Green play dough
Paper plate
Strawberry basket
Glue
Green tissue paper
Directions:
Purchase zoo animal cookies. Have children place three small blobs of green play-dough onto the middle part of a paper plate. Stand 3 different animal cookies into the blobs so they are facing outward. Then take a plastic strawberry basket and put it over top...it looks like the animals are in cages! I traced the square for the basket with a pencil and put a few drops of white glue there so the basket wouldn't fall off. The kids thought this was great. Then you can glue small strips of green tissue paper on the outer edges of the plate to look like grass.