Our Family Motto

We, the Peterson Family:

Promise to be honest in all we do and say,

Stand tall and righteous throughout each day.

Serve around the world and in our home,

Give thanks for blessings we’ve been shown.

We’ll work as a team with joy and love,

And honor our Heavenly Father above.

Monday, December 27, 2010

Pudding Paint


Supplies:
Vanilla Instant Pudding
Milk
Black Paper

Directions:
Let your children paint a white winter scene using vanilla pudding and their fingers! What a delicious work of art!

Hot Tubbing


I bet it’s been a while since you’ve been to the pool! Get wet and have fun with this colorful activity!
Supplies:
• ½ cup liquid hand soap, clear or white
• 1 teaspoon cornstarch
• Food coloring


Directions:
1. Combine the soap and cornstarch in a small bowl.

2. Divide the mixture into separate containers, then add food coloring one drop at a time. Caution: Test the paints on a small area of your tub or wall first to make sure they won't leave a stain; darker hues may be more difficult to wash off.


Tips:
Apply to tub and body with fingers or paintbrushes. Use bathroom cleanser to clean the tub if any color remains. Keep any leftover paints in airtight containers in the refrigerator for up to three days.

Q-Tip Snowflakes


Supplies:
•Blue construction paper or cardstock (or whatever color of background you'd like)
•Q-Tips
•Glue
•Scissors (optional)

Directions:
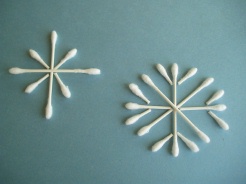
Cut your Q-Tips in various sizes or, just use them whole for younger children. Use them to create beautiful snowflakes on your blue paper. Glue all of your Q-Tips in place and you're finished! Remember, no two snowflakes look alike!

Snowman


Supplies:
Three Potatoes: One large one and two smaller ones
White Acrylic Paint and Paint Brush: For that faux-snow look
Sharp Knife: Only grownups should handle the knives!
Wooden Skewer or Chop Stick
Embellishments: Buttons, pom-poms, ribbon, googly eyes…
Tiny Triangular Slice of Carrot: What's a snowman without a carrot for a nose?
Small Sticks
Raisins: Four or five for the project; the rest of the box can be for a snack!
Hot Glue Gun and Glue Sticks: Remember, kids and hot glue don't mix, so make sure you do all the gluing!

Directions:
Have your child paint the potatoes white with the acrylic paint and let them dry.

Cut a thin slice off of the long side of the biggest potato to create a flat surface for the snowman to "stand" on.

Stack the two smaller spuds on top of the big potato. Secure the pile by sticking the wooden stick up through the stack of potatoes. The potatoes should now look like a miniature stacked snowman.

Invite your child decorate his snowman.

Have him add googly eyes or small black buttons for peepers. You can glue them on with a hot glue gun.

Help him cut a small length of ribbon and tie it around the Spudman's neck for a scarf.

Using the hot glue gun, secure a few pom-poms to his head to create a hat.

To make arms, whittle one end of a stick to make a point. Stick the pointed end into the middle potato to give Mr. Spudman some limbs.

Help him cut a small wedge of carrot for a nose and glue that on, too.

Glue four or five raisins under the nose to make a mouth.

You can then hot-glue some buttons down his torso and your Spudsy Snowman is complete.

Toss out your snowman when he starts to mold or sprout. Snowmen can't stick around forever. As the old holiday classic put it: "Frosty the snowman had to hurry on his way. But he waved goodbye sayin' please don't cry, I'll be back again some day." (Maybe as soon as Mom's next trip to the grocery store!)

Week 52: Winter


*Suggested Reading*
Hello Snow by Hope Vestergaard
I Like Winter by Lois Lenski
Snowball Fight! by Jimmy Fallon
Snowmen at Night by Caralyn Buehner, Mark Buehner (Illustrator)
The Snow Dude by Daniel Kirk


Items needed this week:
Vanilla Instant Pudding
Milk
Black Paper
A half cup liquid hand soap, clear or white
One teaspoon cornstarch
Food coloring
Blue construction paper or cardstock (or whatever color of background you'd like)
Q-Tips
Glue
Scissors
Three Potatoes
White Acrylic Paint and Paint Brush
Sharp Knife
Wooden Skewer or Chop Stick
Embellishments: Buttons, pom-poms, ribbon, googly eyes…
Tiny Triangular Slice of Carrot
Small Sticks
Raisins
Hot Glue Gun and Glue Sticks

Snack Suggestion: Blizzards

Blend together a banana and a scoop of ice cream in a blender. We started to call these blizzards after the kids commented that it looked like a blizzard when it was swirling around in the blender (this was right after they had seen Rudolph the Red Nosed Reindeer).

Paper Bag Santa Puppet


Supplies:
• Paper Bag
• Red,black and white construction paper
• Glue
• Scissors
• 2 Googly eyes
• Cotton balls

Instructions:
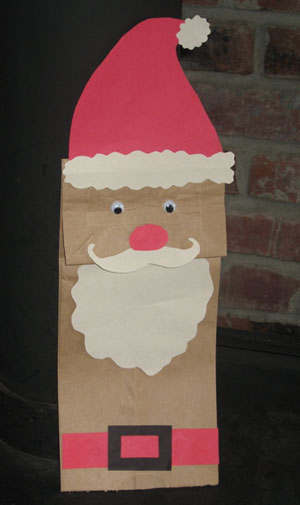
In Red, cut a heart shape for the inside of the mouth, the main part of the hat, a oval for the nose, a long rectangle for the belt.
In Black, cut a black buckle.
In White, cut a beard, a mustache, the bottom of the hat, the puff at the top of the hat.

Glue the heart underneath the flap of the bag. Glue the beard just bellow the flap. Glue the mustache on the edge of the flap overlapping a little. Glue the nose overlapping the mustache a little. Glue the white parts to the red main part of the hat, then glue the completed hat to the top of the bag. Glue white cotton balls to the white parts. Glue the black buckle to the red rectangle, then glue that to the bottom of the bag. Glue the googly eyes in place (If you don't have googly eyes, draw the eyes on with a marker).

Reindeer candy canes


This preschool Christmas craft is easy and enjoyable -- for you and your children. Spend no time at all building your candy canes to give as gifts or to decorate your tree. These little guys can hang on each bough of the Christmas tree to display your kids' hard work.

Supplies:
One package of red and white striped candy canes
Small, red pon pons
Small, black pon pons
One package of brown pipe cleaners
One package of small googly eyes
Scissors
Glue

Directions:
1. Begin your candy cane reindeer by removing all candy canes from the box -- leaving them all wrapped in plastic.

2. Measure 3 inches of brown pipe cleaner and cut. Wrap each 3 inch section of pipe cleaner around the hook of the candy cane to form antlers (measure evenly, with the center on the candy cane). Curl and bend the pipe cleaner to your desire.

3. Glue a red or black pon pon on the end of each candy cane (at the end of the hook) for a nose.

4. Glue 2 googly eyes beneath your antlers and above your nose.

Make as many or as few as you want. They're simple, adorable, and great to spark other preschool Christmas craft ideas. These reindeer candy canes are fun to hook on your tree, tie with ribbon and hang from shelves or your mantle, or stick in small pots or mugs around your house.

Sew up a Stocking


Supplies:
Red felt
Green Yarn
Scissors
Glue
Glitter, beads, cotton balls…

Directions:
Cut out the red felt using the stocking template. Cut small hold along the edges (not the top). Have children sew yarn through the holes. Decorate as much or as little as wanted. Don’t forget to fill it up with treats!

Gingerbread House


Ingredients:

  • white frosting (bought or made from scratch)
  • graham crackers
  • milk containers from school lunch - one for every child
  • small squares of cardboard - one for each child
  • white coconut
  • mini marshmallows
  • gumdrops
  • licorice
  • life savers
  • any other fun, decorative candies
  • cake decorator bags with tips

Directions:

Put frosting in bags with tips.

Glue milk carton down (using frosting as glue) to cardboard square.

(Do next step for smaller children, or, with bigger children, allow them to do it themselves). Put a graham cracker square on 2 milk carton sides. Glue together with frosting. It's okay if it gets on grahams, it looks like snow!

Repeat with other sides.

Angle two grahams at the top for the roof and glue together with frosting.

Now let the kids have fun. White coconut can be used for snow, candies can be glued on the outside of the house, mini marshmallows can be used to build snowmen.

Bigger marshmallows work better with smaller children.

Glue everything with frosting. Now the children’s' houses are completely edible, or can be put up for display.

Week 51: Merry Christmas


*Suggested Reading*
The Nutcracker by Janet Schulman, E. T. A. Hoffmann, Renee Graef
The Oldest Elf by James Stevenson
The Polar Express by Chris Van Allsburg
The Christmas Star by Marcus Pfister
Mooseltoe by Margie Palatini


Items needed this week:
Paper Bag
Red,black and white construction paper
Cotton balls
One package of red and white striped candy canes
Small, red pon pons
Small, black pon pons
One package of brown pipe cleaners
One package of small googly eyes
Red felt
Green Yarn
Scissors
Glue
Glitter, beads, cotton balls…
White frosting (bought or made from scratch)
Graham crackers
Milk containers from school lunch - one for every child
Small squares of cardboard - one for each child
White coconut
Mini marshmallows
Gumdrops
Licorice
Life savers
Any other fun, decorative candies
Cake decorator bags with tips


Snack Suggestion:

*M&Ms
More Than Colors

These special little candies,
Come in colors bright and fun.
There’s more than color to be found;
A story of God’s Son.

The M’s turn into W’s,
If you turn them upside down.
A few more turns and E and 3’s
Are waiting to be found.

M is for the manger,
Where Mary laid her precious boy.
Little did the world know,
This baby would bring great joy.

The W is for the Wise men,
Who followed a bright star.
The star revealed a king was born,
They came but, oh, so far.

In Bethlehem they found Him,
Just as they had been told.
3 is for the gifts they brought;
Frankincense, myrrh and gold

W is also for their worship,
As they bowed before their King,
Salvation is the promise given,
There’s nothing we can bring.

Faith alone is how we come
He died to set us free.
E is for eternity,
God’s gift to you and me.

Monday, December 13, 2010

Bake me a Cake


Ingredients
• 1 1/2 cups water
• 4 ounces unsweetened chocolate
• 1/3 cup cocoa powder
• 1 cup butter, at room temperature
• 3/4 cup granulated sugar
• 3/4 cup brown sugar
• 3 large eggs
• 1 teaspoon vanilla extract
• 2 cups all-purpose flour
• 1 1/2 teaspoons baking soda
• 1/4 teaspoon salt
• Frosting


Instructions

1. Heat the oven to 350ยบ. Grease and flour two 9-inch round pans and set them aside. In a microwave-safe liquid measuring cup, measure 1 1/2 cups water. Add the unsweetened chocolate squares to the water. Microwave for 2 to 3 minutes, stirring after 1 1/2 minutes or until the chocolate has melted. Stir in the cocoa and set the mixture aside.

2. In a large mixing bowl, cream the butter for 1 minute; add the granulated and brown sugars and cream for another 2 minutes or until light and fluffy. Add the eggs individually, beating well after each one. Beat in the vanilla extract.

3. In a separate bowl, stir together the flour, baking soda, and salt. Beginning with about a third of the flour, add the flour mixture and chocolate mixture alternately to the butter and sugar, stirring well after each addition.

4. Divide the cake batter evenly between the two pans, scraping the bowl with a rubber spatula. Place the pans on the middle oven rack and bake for 25 to 30 minutes or until a toothpick inserted in the middle of the cakes comes out clean.

5. Let the cakes cool in the pans for about 10 minutes. Then place a cooling rack atop each pan and, holding the edges to the pan, flip the cake onto the rack. Cool completely before frosting.

6. Place one layer on a plate and spread the top with chocolate frosting. Place the second layer on top and then frost the top and sides of the cake.

7. For a finishing touch, decorate the top and bottom edges of the cake with a piped icing border. Serves 8 to 10.


Frosting:
• 2 1/2 Cups powdered sugar
• 2 Tablespoons water
• 1 Tablespoon light corn syrup
• 1 Tablespoon softened butter
• 1 Tablespoon vanilla extract
• Food coloring to tint

The frosting is ready after all ingredients have been incorporated. If the frosting is too thick, add a teaspoon of water until it reaches the desired consistency.

Good morning Blue Berry Muffins


Ingredients:
• 2-1/2 cups plus flour
• 4 teaspoons baking powder
• 1/2 teaspoon salt
• 1/2 cup plus sugar
1/4 cup butter, melted and cooled or vegetable oil
• 1 egg
• 1 cup milk
• 1 teaspoon vanilla
• 1-1/2 cups blueberries

Preparation:
Preheat oven to 375 degrees F. Grease 12-cup muffin pan. Combine 2-1/2 cups flour, baking powder, salt and 1/2 cup sugar. Set aside. In another bowl combine second set of ingredients. Add to dry ingredients and stir only until moistened. Combine blueberries with 1 tablespoon flour. Then add blueberries to rest of batter. Place in muffin tin. Sprinkle batter tops with sugar. Bake for 20 to 25 minutes.

Banana Bread


Ingredients:
• 1 3/4 cup all purpose flour
• 2 tsp. baking powder
• 1/4 tsp. baking soda
• 1/2 tsp. salt
• 1/3 cup shortening
• 2/3 cup sugar
• 2 eggs, beaten
• 1 cup banana (mashed)

Instructions:
Preheat oven to 350 degrees F.
Cream shortening and sugar, beat in eggs until frothy. Add flour, baking powder and soda, salt alternating with mashed banana.
Once thoroughly mixed pour into 9x5x3" loaf pan. Bake for approximately one (1) hour. Cool in pan 10 minutes before removing.
Nuts of your choice may be added prior to baking for additional flavor and texture.

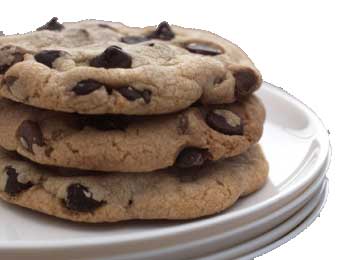
Chocolate Chip Cookies


Ingredients:
• ¾ cup Butter flavored Crisco
• 1 ¼ -cup firmly packed brown sugar
• 2 tablespoons milk
• 1 tablespoon vanilla
• 1 egg
• 1 ¾ cup flour
• 1 teaspoon salt
• ¾ teaspoon baking soda
• 1- 12oz. Bag chocolate chips

Instructions:
Preheat oven to 375 degrees F.
Cream Crisco, brown sugar, milk, and vanilla in a mixing bowl. Blend until creamy. Blend in egg. Combine flour salt and baking soda in a separate bowl. Add to creamed mixture, gradually. Drop by tablespoonful onto an ungreased cookie sheet.
Bake at 375 for 8-10 minutes

Week 50: Baking


*Suggested Reading*
The Incredible Book Eating Boy By Oliver Jeffers
The Apple Pie That Papa Baked by Lauren Thompson
What Should I Make? By Nandini Nayar
This Little Bunny Can Bake by Janet Stein
The Bakery Lady by Pat Mora


Items needed this week:
See Ingredients for each day…

Tuesday, December 7, 2010

Mad Hatter Tea Party


Supplies:
Paper plates
String
Odds and Ends from your craft collection
Cheese and Crackers
Hot dogs
Juice
Apples and Peanut Butter
Sugar cubes or marshmallows (optional)

Directions:
Start out the party by decorating Mad Hatter Hats! Then, set the perfect Wonderland table. Use a table cloth and mismatched place settings. Prepare some tasty finger foods and make the tea! Sit down and enjoy a very happy unbirthday!

Hats:
Have your children decorate a paper plate with any glitzy craft supplied you have. (Feathers, glitter, beads, ribbon, leaves, flowers, yarn, or tissue paper). Punch a hole on either side of the plate and tie a ribbon through. Tie the hat onto the child’s head.

Finger foods:
Cheese and Crackers
Apples and peanut butter
Hot dog pieces on tooth picks

Tea:
Simply warm up some juice (orange, apple, Kool-Aid, grape) on the stove or in the microwave. Allow children to add a spoonful of sugar to each cup of “tea”.

Pirates Treasure Hunt


Supplies:
Shoe box or jewelry box
Glitter and glue to decorate the treasure chest
Five pieces of bright colored paper for clue
Crayons or Markers
Chocolate Coins
Popcorn
Root Beer in a bottle

Directions:
First, you need to make your pirate ship! While the children are coloring place 4 clues around the house. Make the clues easy to identify by using bright colored paper. Even children as young as 2 can play this game by using pictures instead of words on the clues. (e.g. Leave a picture of a bathtub. The next clue should be in the bathtub.) Give the first clue to the children and send them on their quest. The final clue will lead to the treasure! Decorate a shoe box with gold paint and sparkles or use a jewelry box to make your treasure chest. The treasure can be any special surprise! I suggest chocolate coins, root beer in the bottle, and pirate’s booty (popcorn). The kids will LOVE it!

Jungle Safari Lion King Mini Golf


Supplies:
Golf clubs (or sponge and yardstick)
Golf ball or rubber ball
Masking tape
Glue
Scissors
Markers
Shoe box
Cardboard
Coffee can


• Use your own clubs, or masking tape a new sponge to a yardstick
• Build your course (see ideas below) using the coffee can for the final hole.
• Take turns playing your way through your course.
• Save your obstacles for the next rainy day.


Golf Course Ideas:
• For a tunnel, cut out the bottom of an empty oatmeal box, and place the box on its side.

• To make a house, turn a shoe box upside down and cut out an entrance from one end, and the exit from the other end.

• Fold a piece of cardboard in half and set it up like a tent for the ball to go through.

• Place two or three frisbees on the floor to form a curved fairway for the ball to go through.

• Make a ramp by scoring (run one point of the scissors in a straight line without cutting all the way through) a piece of cardboard twice. Bend slightly at each score mark to create a upside, flat, and downside to your ramp. Put some books under the center section for support.


• For a straight fairway, use two rows of building blocks.
• Make a sand trap from a hula hoop.
• For a pipe use paper and tape it.
• Put a chair or stool in the center of the room for the ball to go under.

Set up stuffed animals around the course and sip on some “Jungle” juice when you’re done with your game! (Jungle Juice: ½ apple juice, ½ Sprite)

"Cars" Car


Supplies:

Empty cardboard boxes
Utility knife or box cutter
Scissors
Masking tape
Glue String or twine
Paper or disposable colored plastic plates
Brads
Permanent markers
Decorating materials

Directions:

Step 1
Open the top flaps of the box. Remove three of them with a utility knife or box cutter. Leave one flap, which will become the windshield. Or leave two flaps--one for the windshield, and one for the back window.

Step 2
Turn the box upside down and draw a circle in the center of the bottom of the box. The circle should be large enough to allow your child to slip his or her feet through and pull the box up to wear around the waist. Reinforce the bottom of the box with masking tape if necessary.

Step 3
Draw and then cut out armholes near the top of the sides if the box is a large one so that your child can wear the car like a shirt. Otherwise, just fashion shoulder straps from string or twine and tie them to holes poked in the upper body of the car.

Step 4
Glue a smaller box to the front of the car for the hood, and another to the back for the trunk. Ask your child to decorate a paper plate for a steering wheel. Attach the steering wheel to the "dashboard" of the interior of the car with a brad, so that it will turn. Cut "flames" from colored cardboard or construction paper and glue them onto the back tires.

Step 5
Use permanent markers or paints to create doors on the car. Add tires, lights and windshield wipers. Tires can be made from paper plates and attached with brads so that they will turn, if you wish. Create a license plate with your child's name on it from a plain piece of paper, and affix it to the trunk of the car. Colored tape is great for racing stripes. Ask your child to finish decorating the car. Boys and girls, start your engines!

Week 49: All things Disney


*Suggested Reading*

*On your trip to the library this week find 5 of your favorite Disney stories!

Items needed this week:
Paper plates
String
Odds and Ends from your craft collection
Cheese and Crackers
Hot dogs
Juice
Apples and Peanut Butter
Sugar cubes or marshmallows (optional)
Shoe box or jewelry box
Glitter and glue to decorate the treasure chest
Five pieces of bright colored paper for clue
Crayons or Markers
Chocolate Coins
Popcorn
Root Beer in a bottle
Golf clubs (or sponge and yardstick)
Golf ball or rubber ball
Masking tape
Glue
Scissors
Markers
Shoe box
Cardboard
Coffee can
Empty cardboard boxes
Utility knife or box cutter
Scissors
Masking tape
Glue String or twine
Paper or disposable colored plastic plates
Brads
Permanent markers
Decorating materials

Preparations to be made:
Turn up the Disney tunes and put on the Disney movies! Mickey Mouse here we come!