
Monday, April 26, 2010
Dance My Dance and Freeze Dance
Directions:
Take turns challenging each other to walk like a particular person might, such as a tightrope walker, astronaut on the moon, window washer on a high ledge, old person, baby learning to walk, circus clown, marching soldier, etc. Also, play music and let the children dance and then suddenly stop the music. Instruct the children to freeze when the music stops. Then start the music again! In addition to sparking the imagination, this activity involves a great deal of controlled movement.
LIMBO! LIMBO! LIMBO!
Supplies:
• Piece of rope at least 6 feet long
• Fun Music
Directions:
1. This activity strengthens the muscles and focuses attention. Tie one end of the rope to a tree or chair and hold the free side about 2 feet off the ground.
2. Challenge your child to go under the rope by crawling or scooting on the tummy.
3. Lower the rope a few inches each turn and repeat as many times as possible.
Circle Dances
Directions:
1. Circle dances are a great way to stress body movement.
2. Whether you dance with several children or just one, circle dances can be a lot of fun.
3. Try old favorites like Hokey Pokey, London Bridges, Ring around the Rosie, Mulberry Bush, Skip to My Lou, or Head Shoulders Knees and Toes.
Music and Movement
Supplies:
• Your homemade rhythm instruments, real musical instruments, such as piano or guitar, or recorded music
Directions:
1. The goal of this activity is to have your child experience movement as it relates to music or rhythm.
2. Play different types of music and have your child physically express how the music makes him feel: run for fast music, tiptoe for soft music, hop and bounce for happy music, march for a parade tune, and so on.
3. You can also tap out a rhythmic beat and encourage your child to clap or hop in time to the beat.
Dance
*Suggested Reading*
Barnyard Dance! By Sandra Boynton
Hilda Must Be Dancing by Karma Wilson
Dance with Me: Super Sturdy Picture Book by Charles R. Smith Jr.
Dancing with Daddy by Willy Welch
The Little Ballerina by H.L. Ross
Items needed this week:
The musical Instruments you made last week
6 foot Rope
Snack Suggestion: Monkey Mix
Ingredients:
• 1 1/4 cups dried bananas
• 1 cup each dried papaya and dried mango
• 1/4 cup sliced almonds
• 1/4 cup coconut
• 1/4 cup mini chocolate chips (a tasty substitute for bugs!)
Instructions:
Combine ingredients and enjoy!
Painting with Music
Supplies:
Different Types of Music
Crayons or Markers
Paper
Directions:
Have the children listen to different types of music (classical, techno, upbeat, slow……, etc.) and have them draw what they see in their imaginations. Use a different piece of paper for each song and then compare what each song “looks” like.
Rubber Band Guitar
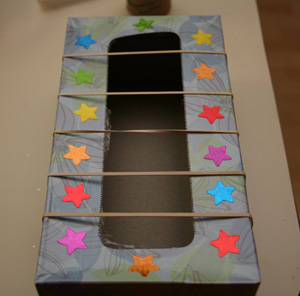
Supplies:
• A plastic or tin container
• Rubber bands that are large enough to stretch around the container
Directions:
1. Stretch several rubber bands around the container so that they are lined up like guitar strings.
2. Pluck and play. Notice how rubber bands of different sizes make different noises.
DRUM

- empty oatmeal box with cover
- yarn
- pen
- 2 pencils
- 2 spools
- construction paper
- crayons
Before beginning, you can decorate the oatmeal box with construction paper and/or crayons for a colorful effect.
Place the cover on the box. Use a pen to make a hole in the center of the cover and in the center of the bottom of the box. Through these holes, pull a piece of yarn long enough to hang around child's neck and down to their waist.
For the drumsticks, place the spools at the ends of the pencils, secure with glue if necessary.
Beat to play.
Instruments
TAMBOURINE and…

Supplies:
• 2 paper plates
• stapler or glue
• hole punch
• string
• jingle bells
• crayons
Directions:
Staple or glue two paper plates together, facing each other. Using a hole punch, make holes around the plates and tie jingle bells to the holes with string. Decorate the tambourine with crayons.
Shake to play.
Toilet Paper Shaker
Supplies:
Empty toilet paper roll
Tape
Rice or beans
Paper
Directions:
Use an empty toilet paper roll. Tape one end using masking tape. Fill with some rice and/or beans. Tape the other end with masking tape. Cover both ends with a piece of round construction paper. Tape. Cover the rest with construction paper. Tape. Decorate. Make music.
Day 3 Craft: DRUM
Supplies:
• 2 paper plates
• stapler or glue
• hole punch
• string
• jingle bells
• crayons
Directions:
Staple or glue two paper plates together, facing each other. Using a hole punch, make holes around the plates and tie jingle bells to the holes with string. Decorate the tambourine with crayons.
Shake to play.
Toilet Paper Shaker
Supplies:
Empty toilet paper roll
Tape
Rice or beans
Paper
Directions:
Use an empty toilet paper roll. Tape one end using masking tape. Fill with some rice and/or beans. Tape the other end with masking tape. Cover both ends with a piece of round construction paper. Tape. Cover the rest with construction paper. Tape. Decorate. Make music.
Day 3 Craft: DRUM
Music
*Suggested Reading*
The Little Band by James Sage
Snake Alley Band by Elizabeth Nygaard
I Know an Old Lady Who Swallowed a Pie (Picture Puffins) by Alison Jackson
The Seals on the Bus by Lenny Hort
If You’re Happy and You Know It By: Raffi
Items needed this week:
• 2 paper plates
• stapler or glue
• hole punch
• string
• jingle bells
• empty oatmeal box with cover
• yarn
• pen
• 2 pencils
• 2 spools
• construction paper
• Empty toilet paper roll
• Tape
• Rice or beans
• Different Types of Music
• Crayons or Markers
• Plastic or tin container
• Rubber bands of different sizes
Preparations to be made:
This week turn the music on! Let the radio play instead of the TV and let your children explore the many different types of music there are! You may even find that your local library has a free music time. Sit on the floor with your children and play instruments and sing the songs they like to hear:
*Ring Around the Rosie
*London Bridges
*Popcorn Popping
*Once There Was a Snowman
*Twinkle Twinkle Little Star
*The Wheels on the Bus
*Do as I’m Doing
*Head Shoulders Knees and Toes
*Old McDonald
*Row Row Row Your Boat
*Itsy Bitsy Spider
*If you’re Happy and You Know It
Thursday, April 15, 2010
Toys for Tots
Have your children clean out their closest and toy boxes. Express to them how blessed they are to have clothes on their backs, food in their bellies, and a roof over their heads. Take the items (clean and in good working order) to a nearby orphanage or to families you know of that are in need.
Visit a Nursing Home

Visit a local nursing home in your community. Many elderly in a home enjoy playing games, talking, or listening to a good book. Bring some home baked treats or a friendly card to share with the elderly.
Help the Animals

Children love animals, so why not use this interest in animals to help out at your local Humane Society by donating your time or supplies (pet food, old blankets). Ask your children to donate an old blanket to help keep an animal warm.
Read Me
Supplies:
Paper
Markers or crayons
Post-its
Directions:
Cut the paper into strips and write positive messages on them such as “God Loves You”, “You are beautiful”, and “You are loved”. Be creative! Any nice note will do.
Then decorate them, fold them in half, and attach a strip of a post-it on it that says, “Read me”
Then take them to a busy place- The park, a shopping center, maybe even the mall and hide them. Leave the “read me” end sticking out of plants, holes, and slits and then watch as people walk by and pick them up.
Teach your children that it’s not always necessary to get a pat on the back from someone you did a good deed for. Sometimes we get the warmest fuzzies inside from doing something for someone without them even knowing it. Remember: your treasure lies in Heaven.
Good Works

*Suggested Reading*
Clifford's Good Deeds by Norman Bridwell
The Ant and the Elephant by Bill Peet
The Little Engine That Could: The Complete, Original Edition by Watty Piper
Rainbow Fish to the Rescue! by Marcus Pfister
The Mitten Tree by Candace Christiansen
Items needed this week:
Paper
Markers or crayons
Post-its
Preparations to be made:
Think of people you know who are in need of service. Is there someone who needs some yard work done, or a meal, or maybe just a friendly visit or simple heartfelt note? This is the week to involve your children in kind, selfless, acts of service. Call your local Humane Society and make an appointment to visit the facility. Also, call your local nursing home and set up a time to make a visit to the elderly. Make sure you ask what they are in need of. Even a quick “drop off” of items they are in need of would be greatly appreciated.
Thursday, April 8, 2010
Visit a neighborhood garden or nursery
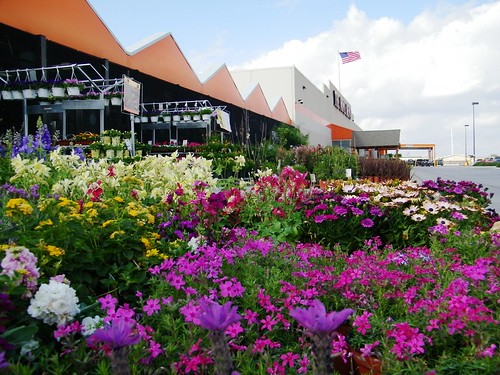
Take your child to a nearby nursery, garden, or even your local Home Depot! Let them explore the different types of plants and flowers. Note the variety of colors, shapes, and sizes!
Plastic Jug Watering Can

Supplies:
• ½ gallon plastic milk or juice jug with handle and lid
• Small finishing nail or screw
• Hammer
• Stickers
Directions:
1. Thoroughly wash out a plastic milk or juice jug.
2. Have your child go through a supply of stickers to choose what they would like to use to decorate their water jug.
3. A grown up should use the tip of a finishing nail or screw and a hammer to gently poke holes in the lid of the jug.
4. Have your child decorate the jug with their choice of stickers. Other options to decorate include gluing on yarn or painting the jug. Keep in mind that the decorations may not last, but the functionality of the watering can will!
5. Fill jug with water and put lid back on.
6. Show child how to hold the jug with the handle and tip it to rain on the flowers!
Tips:
• If the decorations wear off, don't fret--just redecorate the jug with new accessories.
• Add some plant food (according to box directions) to the water jug if children are old enough to understand not to drink it.
• Keep water jug on a low shelf near the garden so your helper can reach it easily.
Grow a Garden

Supplies:
The pot your child painted
Soil
Flower Seeds
Small Rocks
Directions:
Put a layer of small rocks in the bottom of the pot for drainage. Fill with potting soil. Sow seeds 1/4" deep. Water. Place in sunny location. Allow 10 - 14 days to germinate.
Paint a Pot
Supplies:
Small clay pot
Paint
Brushes
Directions:
Have the child paint their own pot to plant their seeds in!
Monday, April 5, 2010
Gardening
*Suggested Reading*
Jack’s Garden
by Henry Cole
The Garden in Our Yard (Read With Me Paperbacks) by Greg Henry Quinn
The Carrot Seed by Ruth Krauss
In My Garden :
A Counting Book by Ward Schumaker
The Very Hungry
Caterpillar by Eric Carle
Items needed this week:
- ½ gallon plastic milk or juice jug with handle and lid
- Small finishing n ail or screw
- Hammer
- Stickers
- Small Clay Pot
- Paint
- Brushes
- Potting Soil
- Flower Seeds
- Small Rocks
Snack Suggestion:

Dirt Cups
Ingredients:
- 2 cups cold milk
- 1 4-serving size package instant chocolate pudding
- 8 oz. frozen whipped topping (such as Cool Whip), thawed
- 1-1/2 cups crushed sandwich cookies (such as Oreos)
- 20 gummy worms
- Clear Plastic Cups
Preparation:
- Whisk together milk and instant pudding for two minutes, until pudding is completely dissolved and. Let stand 5 minutes to thicken.
- Stir in frozen whipped topping and 1/2 cup of the crushed cookies.
- Spoon into 10 cups.
- Sprinkle remaining crushed cookies over the pudding mixture. Top with 2 gummy worms.
- Chill until ready to serve.
Thursday, April 1, 2010
Color Eggs

This Easter tradition dates back to ancient times, when Egyptians and Persians traded decorated eggs at the beginning of spring to celebrate fertility.
Supplies:
· Toothpicks
· Liquid Or Paste Food Coloring
· Metal Spoons
· Cups
· White Hard-boiled Eggs
· Kitchen Knives
· Water
· Metal Tongs
· Empty Paper Towel Rolls
1. Set out a cup or bowl for each color. They must be deep enough to accommodate eggs.
2. Cut an empty paper towel roll into sections; you'll set your finished eggs on them to dry.
3. Scoop a gob of paste-type food coloring (found in the cake decorating section of craft stores) out of the container with a toothpick.
4. Stir it into a cup or bowl with 1 c. very hot water until it's dissolved.
5. Add 1/4 c. white vinegar.
6. Repeat steps 3 to 5 for the various colors.
7. Dip white hard-boiled eggs into the bowls using a metal spoon or tongs.
8. Place the dyed eggs on the egg holders to dry.
Subscribe to:
Posts (Atom)