Our Family Motto

We, the Peterson Family:

Promise to be honest in all we do and say,

Stand tall and righteous throughout each day.

Serve around the world and in our home,

Give thanks for blessings we’ve been shown.

We’ll work as a team with joy and love,

And honor our Heavenly Father above.

Monday, December 27, 2010

Pudding Paint


Supplies:
Vanilla Instant Pudding
Milk
Black Paper

Directions:
Let your children paint a white winter scene using vanilla pudding and their fingers! What a delicious work of art!

Hot Tubbing


I bet it’s been a while since you’ve been to the pool! Get wet and have fun with this colorful activity!
Supplies:
• ½ cup liquid hand soap, clear or white
• 1 teaspoon cornstarch
• Food coloring


Directions:
1. Combine the soap and cornstarch in a small bowl.

2. Divide the mixture into separate containers, then add food coloring one drop at a time. Caution: Test the paints on a small area of your tub or wall first to make sure they won't leave a stain; darker hues may be more difficult to wash off.


Tips:
Apply to tub and body with fingers or paintbrushes. Use bathroom cleanser to clean the tub if any color remains. Keep any leftover paints in airtight containers in the refrigerator for up to three days.

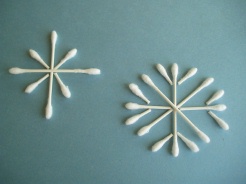
Q-Tip Snowflakes


Supplies:
•Blue construction paper or cardstock (or whatever color of background you'd like)
•Q-Tips
•Glue
•Scissors (optional)

Directions:
Cut your Q-Tips in various sizes or, just use them whole for younger children. Use them to create beautiful snowflakes on your blue paper. Glue all of your Q-Tips in place and you're finished! Remember, no two snowflakes look alike!

Snowman


Supplies:
Three Potatoes: One large one and two smaller ones
White Acrylic Paint and Paint Brush: For that faux-snow look
Sharp Knife: Only grownups should handle the knives!
Wooden Skewer or Chop Stick
Embellishments: Buttons, pom-poms, ribbon, googly eyes…
Tiny Triangular Slice of Carrot: What's a snowman without a carrot for a nose?
Small Sticks
Raisins: Four or five for the project; the rest of the box can be for a snack!
Hot Glue Gun and Glue Sticks: Remember, kids and hot glue don't mix, so make sure you do all the gluing!

Directions:
Have your child paint the potatoes white with the acrylic paint and let them dry.

Cut a thin slice off of the long side of the biggest potato to create a flat surface for the snowman to "stand" on.

Stack the two smaller spuds on top of the big potato. Secure the pile by sticking the wooden stick up through the stack of potatoes. The potatoes should now look like a miniature stacked snowman.

Invite your child decorate his snowman.

Have him add googly eyes or small black buttons for peepers. You can glue them on with a hot glue gun.

Help him cut a small length of ribbon and tie it around the Spudman's neck for a scarf.

Using the hot glue gun, secure a few pom-poms to his head to create a hat.

To make arms, whittle one end of a stick to make a point. Stick the pointed end into the middle potato to give Mr. Spudman some limbs.

Help him cut a small wedge of carrot for a nose and glue that on, too.

Glue four or five raisins under the nose to make a mouth.

You can then hot-glue some buttons down his torso and your Spudsy Snowman is complete.

Toss out your snowman when he starts to mold or sprout. Snowmen can't stick around forever. As the old holiday classic put it: "Frosty the snowman had to hurry on his way. But he waved goodbye sayin' please don't cry, I'll be back again some day." (Maybe as soon as Mom's next trip to the grocery store!)

Week 52: Winter


*Suggested Reading*
Hello Snow by Hope Vestergaard
I Like Winter by Lois Lenski
Snowball Fight! by Jimmy Fallon
Snowmen at Night by Caralyn Buehner, Mark Buehner (Illustrator)
The Snow Dude by Daniel Kirk


Items needed this week:
Vanilla Instant Pudding
Milk
Black Paper
A half cup liquid hand soap, clear or white
One teaspoon cornstarch
Food coloring
Blue construction paper or cardstock (or whatever color of background you'd like)
Q-Tips
Glue
Scissors
Three Potatoes
White Acrylic Paint and Paint Brush
Sharp Knife
Wooden Skewer or Chop Stick
Embellishments: Buttons, pom-poms, ribbon, googly eyes…
Tiny Triangular Slice of Carrot
Small Sticks
Raisins
Hot Glue Gun and Glue Sticks

Snack Suggestion: Blizzards

Blend together a banana and a scoop of ice cream in a blender. We started to call these blizzards after the kids commented that it looked like a blizzard when it was swirling around in the blender (this was right after they had seen Rudolph the Red Nosed Reindeer).

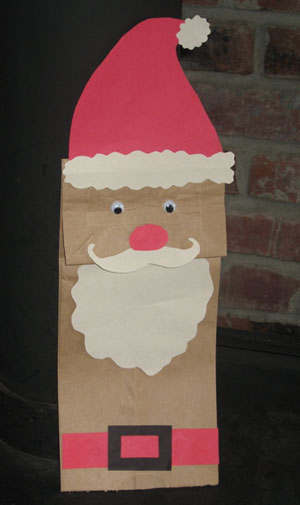
Paper Bag Santa Puppet


Supplies:
• Paper Bag
• Red,black and white construction paper
• Glue
• Scissors
• 2 Googly eyes
• Cotton balls

Instructions:
In Red, cut a heart shape for the inside of the mouth, the main part of the hat, a oval for the nose, a long rectangle for the belt.
In Black, cut a black buckle.
In White, cut a beard, a mustache, the bottom of the hat, the puff at the top of the hat.

Glue the heart underneath the flap of the bag. Glue the beard just bellow the flap. Glue the mustache on the edge of the flap overlapping a little. Glue the nose overlapping the mustache a little. Glue the white parts to the red main part of the hat, then glue the completed hat to the top of the bag. Glue white cotton balls to the white parts. Glue the black buckle to the red rectangle, then glue that to the bottom of the bag. Glue the googly eyes in place (If you don't have googly eyes, draw the eyes on with a marker).

Reindeer candy canes


This preschool Christmas craft is easy and enjoyable -- for you and your children. Spend no time at all building your candy canes to give as gifts or to decorate your tree. These little guys can hang on each bough of the Christmas tree to display your kids' hard work.

Supplies:
One package of red and white striped candy canes
Small, red pon pons
Small, black pon pons
One package of brown pipe cleaners
One package of small googly eyes
Scissors
Glue

Directions:
1. Begin your candy cane reindeer by removing all candy canes from the box -- leaving them all wrapped in plastic.

2. Measure 3 inches of brown pipe cleaner and cut. Wrap each 3 inch section of pipe cleaner around the hook of the candy cane to form antlers (measure evenly, with the center on the candy cane). Curl and bend the pipe cleaner to your desire.

3. Glue a red or black pon pon on the end of each candy cane (at the end of the hook) for a nose.

4. Glue 2 googly eyes beneath your antlers and above your nose.

Make as many or as few as you want. They're simple, adorable, and great to spark other preschool Christmas craft ideas. These reindeer candy canes are fun to hook on your tree, tie with ribbon and hang from shelves or your mantle, or stick in small pots or mugs around your house.