*Suggested Reading*
(Fun books!)
The Snowy Day By Ezra Jack Keats
Harold and the Purple Crayon By Crockett Johnson
Jamberry By Bruce Degen
Cars and Trucks and Things That Go By Richard Scarry
Charlie and Lola Series By Lauren Child
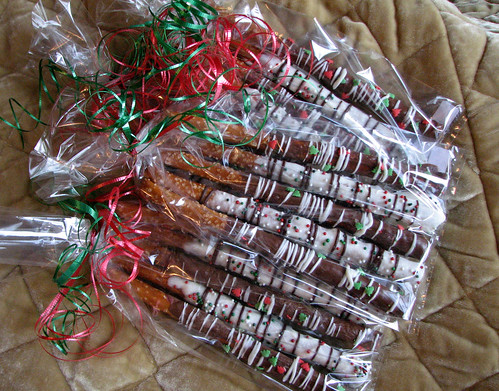
Items needed this week:
One (11 1/2 oz.) pkg. chocolate chips
One 1/4 c. Crisco
Fifty (3 inch) twisted pretzels or 1 lb. mini pretzels
Sprinkles
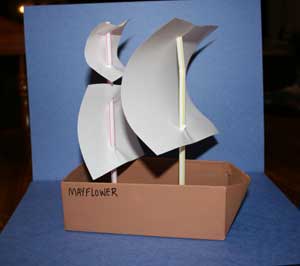
Paint
Card Stalk Paper
Frame
Plaster of Paris
Aluminum pie case
Shells, pebbles, acrylic gems, marbles or other water-resistant treasures to decorate You could even use small plastic toys such as figures or toy cars
Small plain boxes- Jewelry boxes work very well
Glitter, sequins or any ornamentation
Ribbon
Printed poem, on good
Stock paper if possible
Preparations to be made:
This is a good week to start working on your advent calendar for Christmas!
Advent Countdown:
LIST OF GIFTS: (LISTED IN THE ORDER THEY ARE USED)
1. Quarter
2. Grape flavored gum
3. Picture of a smile
4. Goldfish Crackers
5. Birthday candle
6. Bell
7. Fish crackers
8. Cotton balls
9. Piece of a map
10. Soap
11. Heart sticker
12. Cross
13. Packet of salt
14. Sand
15. Flowers(silk)
16. Raisins
17. Seeds
18. Christmas carol
19. Small rock
20. Crumpled foil
21. Mustard seed
22. Dove
23. Small scrap of woolly material
24. Blue marble
25. Picture of a baby.
December 1 - A quarter! That equals 25 cents. But 25 also stands for the number of days till Christmas, when God gave us His best present. Jesus told about one woman's gift and the way she gave it. Read: Mark 12:41-44
December 2 - Grape Gum! Grapes make jelly and juice, raisins and wine. But Jesus didn't need grapes to perform His first miracle. Read: John 2:1-10
December 3 - Here's a smile! A smile usually expresses happiness. Jesus gave us many instructions to keep us happy. Read: Matthew 5:1-12.
December 4 - Fish! Well, if you were surprised to find these fish, wait till you read the story today! Others were surprised to find fish, too. Read: Luke 5:4-7
December 5 - A birthday candle? As you know, we are getting ready to celebrate Jesus' birthday. However, Jesus talked about something else that is related to this candle. Light! Read: Matthew 5:14-16
December 6 - You could make some noise with this. But it would not have bothered a certain man--until he met Jesus. Read: Mark 7:31-37
December 7 - These would not go very far if you were really hungry! But Jesus could make much out of little. Surely He knew how to multiply! Read: Matthew 14:13-21
December 8 - These cotton balls would be helpful in a thunder storm, wouldn't they? We could use them for ear plugs to muffle the loud noises that thunder makes. But we know someone who doesn't need cotton. Jesus can control the weather. Read: Matthew 8:23-27
December 9 - People needing to use the other parts of this map are in trouble! Don't you get lost today! Read: John 14:1-6
December 10 - It's soap. Do you like to wash? Behind your ears? Washing turned out to be a happy time for a man who met Jesus. Read: John 9:1-7
December 11 - Hearts. Wordlessly, they speak of love, don't they? Jesus spoke some commands about love. Read: Matthew 25:17-41
December 12 - We use the cross as a symbol, representing Jesus. Do you know why? Read: Philippines 2:1-11
December 13 - Ordinary salt. Yes, Jesus related salt to us and our behavior. He also gave us some advice. Read: Matthew 5:14 and Colossians 4:6. (Notice that He doesn't recommend pepper!).
December 14 - Don't try to eat this! It's sand. It reminds us that Jesus knows something about architecture, about buildings--and building lives. See His instructions: Matthew 7:24-29.
December 15 - Flowers are pretty, aren't they? Jesus used flowers to teach us a reassuring lesson. Read: Matthew 6:28-34.
December 16 - Raisins! Many children are given raisins instead of candy for a snack. That's because they are a health-promoting and delicious fruit. Jesus told us how we can produce good fruit. Read: John 15:1-5.
December 17 - Jesus told a story about seeds that man planted. Then He explained it, revealing its deep meaning. Read: Matthew 13:3-8 and Matthew 13:18-23.
December 18 -Christmas is just about a week away. And here is an appropriate song. Sing it loudly! Read: Psalms 100.
December 19 - A hard stone! Can you change this stone into a piece of bread? Do you think Jesus could? Jesus was asked to do just that. Do know how He handled it? Read: Matthew 4:1-4.
December 20 - Try to smooth out this piece of aluminum foil and use it as a mirror. It's hard to see your reflection plainly, isn't it? Many circumstances are hard to understand, but someday everything will be clear. Read: 1 Corinthians 13:12.
December 21 - The mustard seed is the smallest there is! When it sprouts, it grows into one of the largest plants! See what Jesus said. Read: Matthew 17:20.
December 22 - We've learned that the cross represents Christ, but do you know what the dove stands for? Read: Matthew 3:13-17.
December 23 - The threads that compose this fabric came from the wool of a sheep. Jesus called Himself the good shepherd. Do you know who His sheep are? Read: John 10:7-18.
December 24 - A marble! Do you know what is sometimes called the "Big Blue Marble"? The world. God made the world for us. What does God continue doing to the world? And who is the world? Read: John 3:16.
December 25 - Isn't this baby cute? When he was born, he made a whole family happy. Jesus was born a baby, too. He came to make the whole world happy. Read: Luke 2:1-20. Enjoy your celebration today. Continue to learn about Jesus--and love Him forever!
Comments about This Craft:
We used the Advent Countdown idea using cardboard egg cartons in our recent Advent Rotation. First, I painted all of the egg cartons. This took some time, so plan ahead. Then I took circle-shaped labels from the dollar store and numbered them 1 - 24, and placed one in each holder. Finally, we set up an assembly line and had the children put each item in a holder. As we went along, we briefly talked about what story the item could be representing. I typed out the list of what the items represented and the scripture reference to take home. The kids all enjoyed the activity, especially trying to guess which Bible story was represented by the items.