
Monday, May 24, 2010
Go to the Playground
Visit your local playground. Many public schools have available playgrounds after school. Have your children shoot some hoops or kick a soccer ball around. If you have enough children involved try to organize a quick game. It’s important to teach young children the value of competition and how to be a good sport- whether they win or lose.
Racing Day
Supplies:
Masking Tape
Directions:
Create an obstacle course with masking tape on the floor around various things inside your house. For example, you can have your kids crawl through big cardboard boxes, climb onto the couch, crawl to the end of the couch and then jump down onto a stack of pillows, then race over to a spot for stacking a set of blocks into a tower, a summersault, hop-skip-and jump, and so on.
Bowling
Supplies:
10 empty plastic liter bottles (preferably soft drink bottles)
A Ball
Directions:
Arrange the bottles in a triangle (try to mimic the standard bowling pin set up) and have the children stand behind a line and attempt to get as many “pins” down as they can.
Tennis

Supplies:
Balloons
Paint Stirrers
Paper Plates
Tape
Directions:
Tape a paint stirrer to a paper plate. This will be your racket. Blow up a balloon. This will be your tennis ball. Have fun hitting the balloon back and forth or challenge your children to keep the balloon off the floor using only their “rackets” for as long as they can.
Sports
*Suggested Reading*
Morgan Plays Soccer by Anne Rockwell
Curious George Plays Baseball by Margret Rey
Clifford's Sports Day by Norman Bridwell
The Berenstain Bears Get Their Kicks by Stan Berenstain
Let's Play Baseball: Super Sturdy Picture Books by Charles R. Smith
Items needed this week:
Masking Tape
Balloons
Paint Stirrers
Paper Plates
10 empty plastic liter bottles (preferably soft drink bottles)
A Ball
Soccer Ball
Football
Basket Ball
Snack Suggestion: Sports Candy
Ingredients:
One Apple
½ cup walnuts or pecans
½ tsp cinnamon
Multi grain crackers
Directions:
Cut up the apple and nuts into small pieces. Sprinkle the cinnamon into the mix. Put it on top of a cracker!
Monday, May 17, 2010
Pick up in the Park
Supplies:
Trash Bags
Gloves
Directions:
Visit the local park, lake, or beach and spend some time cleaning up trash. When you’re done play in the nice clean area you created!
Trash Bags
Gloves
Directions:
Visit the local park, lake, or beach and spend some time cleaning up trash. When you’re done play in the nice clean area you created!
Happy Earth Craft

Supplies:
• Paper Plate
• Paint
• Construction Paper
• Wiggle Eyes
• Craft Glue
• Scissors
Directions:
Find a picture of the planet Earth and use that as a guide if you like. Use green and blue paint on the back side of the paper plate to make your own Earth picture. Let the glue dry.
Once the paint is dry, glue on the wiggle eyes. Cut a smiling mouth out of construction paper and glue it on. Cut out arms and legs and glue them in place. If you like, you can also make a sad Earth by cutting out a frown instead of a smile.
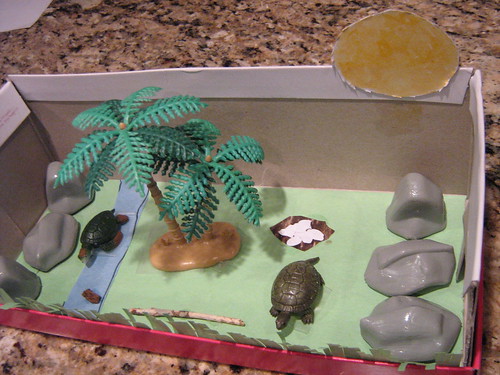
HABITAT CRAFT
Materials Required:
• Shoe box with lid.
• Blue paint (and other colors if you like)
• Scissors
• Glue
• Cellophane, cling wrap or wax paper
• Sand (you can substitute dirt from your yard if you don't have sand. Just make sure it's dry). Whole wheat flour works too.
• Pinecones or small toy trees (must fit inside the closed shoe box)
• Bits of dried plant material (dried moss, dried flowers, dried leaves, etc) or bits of ripped up green and brown tissue paper or crepe paper.
• Rocks or pebbles.
• Small toy animals that you would find in a forest (bears, deer or dinosaurs... dinosaurs seemed to fit anywhere in the kids' minds).
peer through the hole to see your habitat
Instructions:
• This is tough to explain in words, so bear with me. Place the shoe box on the table normally (like you were going to put shoes inside it). It has a bottom (where we'll be making our habitat), 2 long sides and 2 short sides. In the center of one of the short sides, you are going to put a peep hole a bit bigger than a quarter. We'll use this hole on the finished craft to peek through to view the habitat (it's a neat effect... tricks the eye into thinking everything's big). Cut the hole on one of the short sides using a pair of scissors or a cardboard cutter. This part will require adult assistance. We actually had a shoe box with a hole already in it so we didn't have to cut one.
• Paint the inside of the shoe box blue (including the inside of the shoe box lid).
It looks better in real life, but this gives you
an idea of what it is like to look through the hole
• Now, take the lid and cut a square out of it. Leave enough of the lid intact so that it's structurally sound. This hole will be the sky and will let light in the top so we can see things when we peek in the hole. Again this will likely require a bit of help from a grownup
• Glue or tape cellophane, cling wrap or wax paper onto the shoe box lid to cover the hole you just made. (The cellophane is transparent so will let light through). If you use a tinted cellophane then the habitat will take on that tinge when you look through into it.
• Now comes the fun part! Let's make our habitat:
o Glue sand or dirt to the bottom of the box. (We actually covered our bottom with dried mosses instead of dirt)
o Glue the pinecones or plastic trees to the bottom of the box as your trees
o Glue rocks or pebbles to the bottom of the box.
o Glue crepe paper, tissue paper, dried plant material, etc. into the box to make bushes and plant life.
o Glue your animals into the bottom of the box. Put them nearer the peep hole with the vegetation and trees in the background so when you look through you see the animals.
o You can use play dough to help attach some of the toy figures to the bottom of the box.
o Let everything dry, then put the lid back on (you might want to tape it so it stays attached)
o Option: Rather than simply painting the inside of the box blue, older children might like to paint the bottom green and the sides blue. Once dry, they can paint trees, shrubs, volcanos or mountains onto the sides (it's a bit tough because they're painting on the inside of the box, but it does look nice).
o Kids can also glue a few pieces of cotton ball onto the sides or top to make clouds in the sky. They can put on the lid and peek through the hole as they go to see how it looks.
• Note: We just covered the entire bottom of the box with glue and then arranged everything. We left it overnight to dry. This was enough to hold things alright (although they will come lose if you toss it around). Another idea is to leave the materials lose so the kids can rearrange their creation during playtime.
OTHER HABITATS (Again, I've just given thoughts... use what you have on hand... this is a great project for exercising creativity... go on a nature walk, collect items and then make a habitat box!):
• BIRDS IN THE SKY:
Paint inside of the box sky blue
Cover the bottom of the box with cotton balls so it looks like clouds
Attach toy birds to pieces of thread or fishing line and hang them from the shoe box lid.
• FISH IN THE OCEAN:
Paint the inside of the box sea blue or sea green
It's nice to cover this one with a green or blue tinted cellophane if you have it.
Glue sand or rocks to the bottom
Glue aquarium plants into it. Strips of blue/green crepe/tissue paper make nice looking kelp. You can use spray starch if you want them to stand up a bit better.
Put sea shells, lobsters or other ground fish on the bottom.
Attach toy fish to pieces of thread of fishing line and hang them from the shoe box lid so it looks like they're swim
Mud pies

Take one bucket filled with mud, add 1 bucket of sand and enough water to make the whole mess pliable. Let your kids squish and splish 'til the cows come home.
Mother Nature
*Suggested Reading*
Earth Day--Hooray! (MathStart 3) by Stuart J. Murphy, Renee Andriani (Illustrator)
Lets Celebrate Earth Day by Peter Roop
Recycle! : A Handbook for Kids by Gail Gibbons
The Garbage Monster by Joni Sensel, Christopher L. Bibins (Illustrator)
The Lorax by Dr. Seuss, Theodor Seuss Geisel
Items needed this week:
Shoe box with lid
Blue paint (and other colors if you like)
Scissors
Glue
Cellophane, cling wrap or wax paper
Sand (you can substitute dirt from your yard if you don't have sand. Just make sure it's dry). Whole wheat flour works too.
Pinecones or small toy trees (must fit inside the closed shoe box)
Bits of dried plant material (dried moss, dried flowers, dried leaves, etc) or bits of ripped up green and brown tissue paper or crepe paper.
Rocks or pebbles
Small toy animals that you would find in a forest (bears, deer or dinosaurs... dinosaurs seemed to fit anywhere in the kids' minds).
Trash Bags
Gloves
Snack Suggestion: Frozen Frog Eggs

Ingredients:
• 2 Kiwi fruit
• 1 cup of limeade (we used a natural brand without artificial color)
• 1 tablespoon of honey
• 8 3-ounce paper or plastic cups
• Popsicle sticks
Instructions:
1. To make a batch, cut a ripe, peeled kiwi fruit into chunks. Blend the fruit chunks with 1 cup of limeade and a tablespoon or so of honey until the mixture is somewhat smooth (some small lumps are fine).
2. Slice a second kiwi into eight thin pieces and press them into the bottoms of eight 3-ounce plastic or paper cups. Pour the blended mixture into the cups, filling them each about halfway.
3. Place the cups in a Pyrex baking dish and cover them with foil. Insert a popsicle stick through the foil and into each cup (the foil will hold the sticks in place) and freeze the pops until solid, about 4 hours.
4. When you're ready to remove the pops from their molds, you can loosen them by briefly dipping the bottoms of the cups in warm water if necessary. Makes 8.
Earth Day--Hooray! (MathStart 3) by Stuart J. Murphy, Renee Andriani (Illustrator)
Lets Celebrate Earth Day by Peter Roop
Recycle! : A Handbook for Kids by Gail Gibbons
The Garbage Monster by Joni Sensel, Christopher L. Bibins (Illustrator)
The Lorax by Dr. Seuss, Theodor Seuss Geisel
Items needed this week:
Shoe box with lid
Blue paint (and other colors if you like)
Scissors
Glue
Cellophane, cling wrap or wax paper
Sand (you can substitute dirt from your yard if you don't have sand. Just make sure it's dry). Whole wheat flour works too.
Pinecones or small toy trees (must fit inside the closed shoe box)
Bits of dried plant material (dried moss, dried flowers, dried leaves, etc) or bits of ripped up green and brown tissue paper or crepe paper.
Rocks or pebbles
Small toy animals that you would find in a forest (bears, deer or dinosaurs... dinosaurs seemed to fit anywhere in the kids' minds).
Trash Bags
Gloves
Snack Suggestion: Frozen Frog Eggs
Ingredients:
• 2 Kiwi fruit
• 1 cup of limeade (we used a natural brand without artificial color)
• 1 tablespoon of honey
• 8 3-ounce paper or plastic cups
• Popsicle sticks
Instructions:
1. To make a batch, cut a ripe, peeled kiwi fruit into chunks. Blend the fruit chunks with 1 cup of limeade and a tablespoon or so of honey until the mixture is somewhat smooth (some small lumps are fine).
2. Slice a second kiwi into eight thin pieces and press them into the bottoms of eight 3-ounce plastic or paper cups. Pour the blended mixture into the cups, filling them each about halfway.
3. Place the cups in a Pyrex baking dish and cover them with foil. Insert a popsicle stick through the foil and into each cup (the foil will hold the sticks in place) and freeze the pops until solid, about 4 hours.
4. When you're ready to remove the pops from their molds, you can loosen them by briefly dipping the bottoms of the cups in warm water if necessary. Makes 8.
Monday, May 10, 2010
Anytime Cards
Supplies:
• Construction paper
• Old magazines
• Scissors
• Glue
Directions:
1. Cut a piece of construction paper as big as you'd like your card. Cut out the letters you will need from old magazines.
2. Ask the child to pick out the first letter of the word and glue it on the page. Continue until the message has been built.
Tie Card for Dad
Make a great tie card for Dad.
Supplies:
• A piece of card stock or heavy construction paper
• Scissors
• Markers or crayons
• Glue
• 5 small white shirt buttons (optional)
• A piece of colored construction paper or an old tie (ask Dad for an old tie you can cut up, just don't tell him why you want it)
To start making the shirt, cut the top of the card stock into an "M" shape.
Fold over the M-shaped area.
Draw a line down the center.
Either draw 3 buttons, glue on three paper circle (cut with a hole puch) or glue real buttons on the paper to the right of the line you just drew.
Either make a tie from construction paper or use the bottom part of an old tie (ask Dad for an old tie you can cut up, just don't tell him why you want it).
Glue the top of the tie to the card. The rest of the tie should be free to move.
Fold down the collar flaps and glue them down.
Either draw a button on each collar flap or glue on real buttons.
Write a message to Dad on the tie, on the underside of the tie, and/or on the area of the shirt that is hidden by the tie.
Optional:
Make a pocket with a handkerchief. Glue a small paper rectangle (the same color as the shirt) onto the shirt. Only put glue on three sides of the pocket -- do not put glue on the top so the handkerchief can slip in and out of the pocket. Cut out a small piece of paper that will fit into the pocket -- this will be the handkerchief. Write a message to dad on the "handkerchief."
Mother's Day Card
Supplies:
Construction paper
Tempera paint
Pie pan
Scissors
Pencil
Directions:
Fold the construction paper in half to form a card. Pour enough tempera paint in the pie pan to cover the bottom. Have the child lay the palm of the hand in the paint. Take the hand out of the paint and press the hand on the front of the card, with the small finger along the folded edge. Let dry. Leaving the card folded, cut out the handprint so the card is now in the shape of the handprint. Open the card and write the message.
Book of Kisses
Supplies:
Paper
Markers
Lipstick
Directions:
The children can make a "Book Of Kisses". Make booklets by cutting paper into 4 inch squares and stapling ten sheets together in one booklet for each child. Write "Book of Kisses" on the top page and invite the children to decorate the page that is the cover of the booklet. Color the children's lips with lipstick and have them kiss each page of the book. Recipients can redeem each page for a real kiss.
Making Cards
*Suggested Reading*
(These books aren’t about making cards but they are fun!)
The Shape of Things by Illustrator-Julie Lacome
Fast Food By Saxton Freymann
Where's My Teddy? By Jez Alborough
How I Became a Pirate By Melinda Long, illustrated by David Shannon
Sheep in the Jeep By Nancy E. Shaw and Margot Apple
Items needed this week:
Construction paper
Old magazines
Scissors
Markers or crayons
Glue
5 small white shirt buttons (optional)
A piece of colored construction paper or an old tie (ask Dad for an old tie you can cut up, just don't tell him why you want it)
Tempera paint
Lipstick
Preparations to be made:
Take inventory of birthdays and special occasions coming up. We will be working on Mother’s Day and Father’s Day cards but feel free to make a stash of birthday, thank you, and congratulation cards as well!
Monday, May 3, 2010
Mini Sombrero

Supplies:
• Styrofoam or paper cup
• Mini paper plate
• 1" wide strip of brown felt
• 1/4" wide strip of red felt
• 1/4" wide strip of orange felt
• Acrylic paint in red and sunflower (tan/yellow)
• Medium pom-poms in red, green, yellow, orange, white and brown
• Paint brush
• Hot glue gun
Directions:
1. Paint paper plate and Styrofoam cup with sunflower paint. Let dry and repeat. Paint the outer edge of the plate rim red. Let dry completely.
2. Hot glue the Styrofoam cup to the center of the paper plate to form your hat.
3. Glue the brown felt around the bottom of the Styrofoam cup (the edge that is touching the plate) to make the hat band. Glue the red and orange felt over the brown to create stripes.
4. Glue the pom-poms to the red edge of the paper plate, alternating colors as you go (green, white, red, yellow, brown, orange, green, white, etc.).
Tips:
• If you don't have a color paint similar to tan or "sunflower" on hand, make your own by mixing a little brown into some yellow paint until it is the color you desire.
• Use any color of pom-pom you like. If you don't have all the colors listed here, simply use what you have on hand.
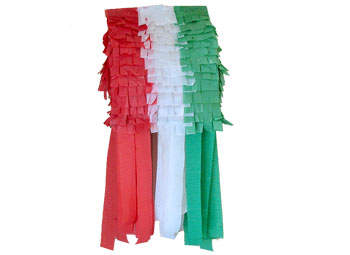
Mexican Flag Pinata
Supplies:
• 1 brown paper grocery bag
• Tissue paper in red, white and green
• Crepe paper streamers in red, green and white
• 24” green yarn
• Hole punch
• Stapler
• Newspaper or other lightweight filler
• Small trinkets and candies
• Scissors
• White glue
Directions:
1. Open the grocery bag and put treats and trinkets inside. Fill about ¼ full.
2. Fill remaining space with crumpled up newspaper. Leave a small amount of space at the top of the bag so it can be folded over and closed.
3. Fold top over and secure with staples.
4. Poke or punch a hole in the middle of the bag in the fold. Be sure it's low enough that the hole won't rip.
5. Cut strips of tissue paper (in each color) about 3” x 5”. The easiest way to do this is to cut a strip of tissue paper 5” wide the full length of the sheet. Next fold the tissue paper in half, cut. Hold those two together and fold both in half, cut. Repeat until you have rectangles that are approximately 3” x 5”.
6. Fringe the ends of the tissue paper by cutting slits about halfway up.
7. Starting at the bottom of the bag, glue the tissue paper onto the bag by the solid edge only, do not glue the fringe down. Start with red on the left, then white in the middle, and green on the right.
8. Repeat these steps, working your way upward toward the top of the bag.
9. Cover the right side of the bag with green and the left side of the bag with red. Repeat the process on the other side, lining up the colors so that they match the side colors (green will be at the left and red at the right).
10. Thread string or yarn through hole at the top and tie a knot.
11. Gently lay the bag on its side.
12. Cut 12 strips of crepe paper streamers (12 of each color) and glue to the bottom of the bag.
13. Set aside to dry completely.
14. Hang by your string and hit with a waffle bat or rolled up newspaper until it breaks.
Tips:
• Shop for Mexican candies to put in your pinata.
• Instead of crepe paper streamers, you can cut long thing strips of tissue paper.
• To reinforce your hanger, add a few staples through the yarn and the bag.
Mexican Clay Pottery
Pottery making is one of the oldest traditions in Mexican culture, and is still widely practiced today. Use our easy homemade clay recipe to make and bake your own pottery crafts!
Supplies:
• 4 Cups Flour
• 1 Cup Salt
• Approximately 1 ¾ Cups water (you will have to add drops here and there while working)
• Optional food coloring
• Paints & brush
Directions:
1. Mix the flour and salt.
2. Add the water a little at a time while mixing (this is perfect for the kids to get their hands in there!)
3. Optional - Add food coloring.
4. Pinch pot instructions: Sculpt clay into a ball and push down the middle for the bottom of the pot. Sculpt the sides by pinching up and making the clay thinner.
5. Coil pot instructions: Make a flat circle out of a piece of clay. Next make long coils out of pieces of clay and coil them one on top of the other around the edge of the flat circle piece.
6. Bake at 200 degrees F for about 10 – 15 minutes for the pinch pot and about 20 minutes for the coil pot, or until hard. They will be slightly rubbery.
7. Let cool and paint.
8. If you have any clay left over you can freeze it in plastic wrap.
Cucumber Cactus

This Cucumber Cactus craft is so easy and fun to make. Who knew you could make a cactus from an inexpensive vegetable? This craft makes a great centerpiece at a cowboy or western theme party!
Supplies:
Cucumbers
Toothpicks
Sand or graham cracker crumbs
Plate
Directions:
1. Cut your cucumbers to the size you wish.
2. Break the ends off your tooth picks and insert them into the cucumber. If you don't want the ends to be as "prickly" insert the sharp end into the cucumber so the blunt end is sticking out (this is a better option for younger children).Sprinkle some graham wafer crumbs, or real sand, onto a plate and arrange your cacti.
This would make a great centerpiece for a table, or in the middle of a veggie tray!
Cinco De Mayo
*Suggested Reading*
Too Many Tamales by Gary Soto
The Pinata Maker/El pinatero by George Ancona
Saturday Market by Patricia Grossman
My Mexico / México mío by Tony Johnston
Magda's Tortillas / Las Tortillas De Magda by Becky Chavarria-Chairez
Items needed this week:
• Styrofoam or paper cup
• Mini paper plate
• 1" wide strip of brown felt
• 1/4" wide strip of red felt
• 1/4" wide strip of orange felt
• Acrylic paint in red and sunflower (tan/yellow)
• Medium pom-poms in red, green, yellow, orange, white and brown
• Paint brush
• Hot glue gun
• 1 brown paper grocery bag
• Tissue paper in red, white and green
• Crepe paper streamers in red, green and white
• 24” green yarn
• Hole punch
• Stapler
• Newspaper or other lightweight filler
• Small trinkets and candies
• Scissors
• White glue
• 4 Cups Flour
• 1 Cup Salt
• Approximately 1 ¾ Cups water (you will have to add drops here and there while working)
• Optional food coloring
• Paints & brush
• Cucumbers
• Tooth Picks
Preparations to be made:
Don’t forget about great dinner deals on “Taco Tuesday” Nights. Also, homemade quesadillas are simple to make! Just sprinkle some cheese on a tortilla and cook in the microwave for a minute. Mexican food is the best part of Cinco De Mayo so look online for some recipes! Yum!
Subscribe to:
Posts (Atom)