Supplies:
Paper
Markers
Lipstick
Directions:
The children can make a "Book Of Kisses". Make booklets by cutting paper into 4 inch squares and stapling ten sheets together in one booklet for each child. Write "Book of Kisses" on the top page and invite the children to decorate the page that is the cover of the booklet. Color the children's lips with lipstick and have them kiss each page of the book. Recipients can redeem each page for a real kiss.

Monday, May 10, 2010

Making Cards
*Suggested Reading*
(These books aren’t about making cards but they are fun!)
The Shape of Things by Illustrator-Julie Lacome
Fast Food By Saxton Freymann
Where's My Teddy? By Jez Alborough
How I Became a Pirate By Melinda Long, illustrated by David Shannon
Sheep in the Jeep By Nancy E. Shaw and Margot Apple
Items needed this week:
Construction paper
Old magazines
Scissors
Markers or crayons
Glue
5 small white shirt buttons (optional)
A piece of colored construction paper or an old tie (ask Dad for an old tie you can cut up, just don't tell him why you want it)
Tempera paint
Lipstick
Preparations to be made:
Take inventory of birthdays and special occasions coming up. We will be working on Mother’s Day and Father’s Day cards but feel free to make a stash of birthday, thank you, and congratulation cards as well!
(These books aren’t about making cards but they are fun!)
The Shape of Things by Illustrator-Julie Lacome
Fast Food By Saxton Freymann
Where's My Teddy? By Jez Alborough
How I Became a Pirate By Melinda Long, illustrated by David Shannon
Sheep in the Jeep By Nancy E. Shaw and Margot Apple
Items needed this week:
Construction paper
Old magazines
Scissors
Markers or crayons
Glue
5 small white shirt buttons (optional)
A piece of colored construction paper or an old tie (ask Dad for an old tie you can cut up, just don't tell him why you want it)
Tempera paint
Lipstick
Preparations to be made:
Take inventory of birthdays and special occasions coming up. We will be working on Mother’s Day and Father’s Day cards but feel free to make a stash of birthday, thank you, and congratulation cards as well!
Monday, May 3, 2010
Mini Sombrero

Supplies:
• Styrofoam or paper cup
• Mini paper plate
• 1" wide strip of brown felt
• 1/4" wide strip of red felt
• 1/4" wide strip of orange felt
• Acrylic paint in red and sunflower (tan/yellow)
• Medium pom-poms in red, green, yellow, orange, white and brown
• Paint brush
• Hot glue gun
Directions:
1. Paint paper plate and Styrofoam cup with sunflower paint. Let dry and repeat. Paint the outer edge of the plate rim red. Let dry completely.
2. Hot glue the Styrofoam cup to the center of the paper plate to form your hat.
3. Glue the brown felt around the bottom of the Styrofoam cup (the edge that is touching the plate) to make the hat band. Glue the red and orange felt over the brown to create stripes.
4. Glue the pom-poms to the red edge of the paper plate, alternating colors as you go (green, white, red, yellow, brown, orange, green, white, etc.).
Tips:
• If you don't have a color paint similar to tan or "sunflower" on hand, make your own by mixing a little brown into some yellow paint until it is the color you desire.
• Use any color of pom-pom you like. If you don't have all the colors listed here, simply use what you have on hand.
Mexican Flag Pinata
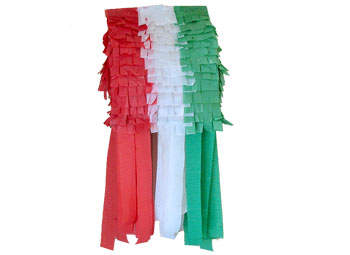
Supplies:
• 1 brown paper grocery bag
• Tissue paper in red, white and green
• Crepe paper streamers in red, green and white
• 24” green yarn
• Hole punch
• Stapler
• Newspaper or other lightweight filler
• Small trinkets and candies
• Scissors
• White glue
Directions:
1. Open the grocery bag and put treats and trinkets inside. Fill about ¼ full.
2. Fill remaining space with crumpled up newspaper. Leave a small amount of space at the top of the bag so it can be folded over and closed.
3. Fold top over and secure with staples.
4. Poke or punch a hole in the middle of the bag in the fold. Be sure it's low enough that the hole won't rip.
5. Cut strips of tissue paper (in each color) about 3” x 5”. The easiest way to do this is to cut a strip of tissue paper 5” wide the full length of the sheet. Next fold the tissue paper in half, cut. Hold those two together and fold both in half, cut. Repeat until you have rectangles that are approximately 3” x 5”.
6. Fringe the ends of the tissue paper by cutting slits about halfway up.
7. Starting at the bottom of the bag, glue the tissue paper onto the bag by the solid edge only, do not glue the fringe down. Start with red on the left, then white in the middle, and green on the right.
8. Repeat these steps, working your way upward toward the top of the bag.
9. Cover the right side of the bag with green and the left side of the bag with red. Repeat the process on the other side, lining up the colors so that they match the side colors (green will be at the left and red at the right).
10. Thread string or yarn through hole at the top and tie a knot.
11. Gently lay the bag on its side.
12. Cut 12 strips of crepe paper streamers (12 of each color) and glue to the bottom of the bag.
13. Set aside to dry completely.
14. Hang by your string and hit with a waffle bat or rolled up newspaper until it breaks.
Tips:
• Shop for Mexican candies to put in your pinata.
• Instead of crepe paper streamers, you can cut long thing strips of tissue paper.
• To reinforce your hanger, add a few staples through the yarn and the bag.
Mexican Clay Pottery
Pottery making is one of the oldest traditions in Mexican culture, and is still widely practiced today. Use our easy homemade clay recipe to make and bake your own pottery crafts!
Supplies:
• 4 Cups Flour
• 1 Cup Salt
• Approximately 1 ¾ Cups water (you will have to add drops here and there while working)
• Optional food coloring
• Paints & brush
Directions:
1. Mix the flour and salt.
2. Add the water a little at a time while mixing (this is perfect for the kids to get their hands in there!)
3. Optional - Add food coloring.
4. Pinch pot instructions: Sculpt clay into a ball and push down the middle for the bottom of the pot. Sculpt the sides by pinching up and making the clay thinner.
5. Coil pot instructions: Make a flat circle out of a piece of clay. Next make long coils out of pieces of clay and coil them one on top of the other around the edge of the flat circle piece.
6. Bake at 200 degrees F for about 10 – 15 minutes for the pinch pot and about 20 minutes for the coil pot, or until hard. They will be slightly rubbery.
7. Let cool and paint.
8. If you have any clay left over you can freeze it in plastic wrap.
Supplies:
• 4 Cups Flour
• 1 Cup Salt
• Approximately 1 ¾ Cups water (you will have to add drops here and there while working)
• Optional food coloring
• Paints & brush
Directions:
1. Mix the flour and salt.
2. Add the water a little at a time while mixing (this is perfect for the kids to get their hands in there!)
3. Optional - Add food coloring.
4. Pinch pot instructions: Sculpt clay into a ball and push down the middle for the bottom of the pot. Sculpt the sides by pinching up and making the clay thinner.
5. Coil pot instructions: Make a flat circle out of a piece of clay. Next make long coils out of pieces of clay and coil them one on top of the other around the edge of the flat circle piece.
6. Bake at 200 degrees F for about 10 – 15 minutes for the pinch pot and about 20 minutes for the coil pot, or until hard. They will be slightly rubbery.
7. Let cool and paint.
8. If you have any clay left over you can freeze it in plastic wrap.
Cucumber Cactus
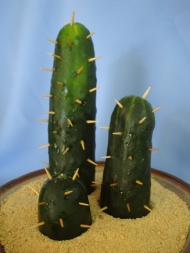
This Cucumber Cactus craft is so easy and fun to make. Who knew you could make a cactus from an inexpensive vegetable? This craft makes a great centerpiece at a cowboy or western theme party!
Supplies:
Cucumbers
Toothpicks
Sand or graham cracker crumbs
Plate
Directions:
1. Cut your cucumbers to the size you wish.
2. Break the ends off your tooth picks and insert them into the cucumber. If you don't want the ends to be as "prickly" insert the sharp end into the cucumber so the blunt end is sticking out (this is a better option for younger children).Sprinkle some graham wafer crumbs, or real sand, onto a plate and arrange your cacti.
This would make a great centerpiece for a table, or in the middle of a veggie tray!
Cinco De Mayo
*Suggested Reading*
Too Many Tamales by Gary Soto
The Pinata Maker/El pinatero by George Ancona
Saturday Market by Patricia Grossman
My Mexico / México mío by Tony Johnston
Magda's Tortillas / Las Tortillas De Magda by Becky Chavarria-Chairez
Items needed this week:
• Styrofoam or paper cup
• Mini paper plate
• 1" wide strip of brown felt
• 1/4" wide strip of red felt
• 1/4" wide strip of orange felt
• Acrylic paint in red and sunflower (tan/yellow)
• Medium pom-poms in red, green, yellow, orange, white and brown
• Paint brush
• Hot glue gun
• 1 brown paper grocery bag
• Tissue paper in red, white and green
• Crepe paper streamers in red, green and white
• 24” green yarn
• Hole punch
• Stapler
• Newspaper or other lightweight filler
• Small trinkets and candies
• Scissors
• White glue
• 4 Cups Flour
• 1 Cup Salt
• Approximately 1 ¾ Cups water (you will have to add drops here and there while working)
• Optional food coloring
• Paints & brush
• Cucumbers
• Tooth Picks
Preparations to be made:
Don’t forget about great dinner deals on “Taco Tuesday” Nights. Also, homemade quesadillas are simple to make! Just sprinkle some cheese on a tortilla and cook in the microwave for a minute. Mexican food is the best part of Cinco De Mayo so look online for some recipes! Yum!
Too Many Tamales by Gary Soto
The Pinata Maker/El pinatero by George Ancona
Saturday Market by Patricia Grossman
My Mexico / México mío by Tony Johnston
Magda's Tortillas / Las Tortillas De Magda by Becky Chavarria-Chairez
Items needed this week:
• Styrofoam or paper cup
• Mini paper plate
• 1" wide strip of brown felt
• 1/4" wide strip of red felt
• 1/4" wide strip of orange felt
• Acrylic paint in red and sunflower (tan/yellow)
• Medium pom-poms in red, green, yellow, orange, white and brown
• Paint brush
• Hot glue gun
• 1 brown paper grocery bag
• Tissue paper in red, white and green
• Crepe paper streamers in red, green and white
• 24” green yarn
• Hole punch
• Stapler
• Newspaper or other lightweight filler
• Small trinkets and candies
• Scissors
• White glue
• 4 Cups Flour
• 1 Cup Salt
• Approximately 1 ¾ Cups water (you will have to add drops here and there while working)
• Optional food coloring
• Paints & brush
• Cucumbers
• Tooth Picks
Preparations to be made:
Don’t forget about great dinner deals on “Taco Tuesday” Nights. Also, homemade quesadillas are simple to make! Just sprinkle some cheese on a tortilla and cook in the microwave for a minute. Mexican food is the best part of Cinco De Mayo so look online for some recipes! Yum!
Subscribe to:
Posts (Atom)